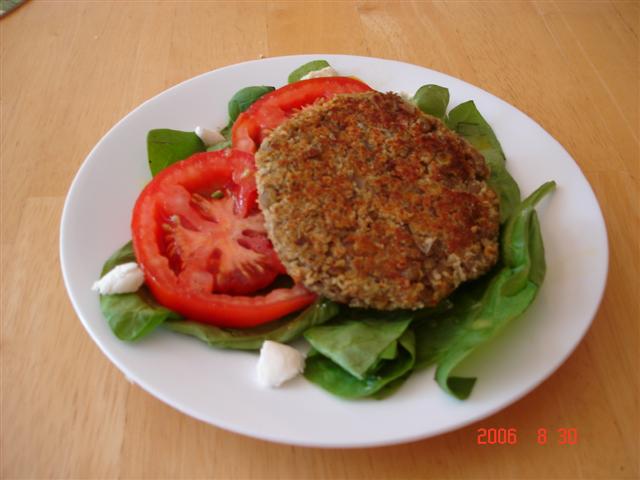
Wednesday, August 30, 2006

Lentil Burgers

I have made this recipe many times already, and every time I made I liked it a lot! Although right now my favorite are the baked falafels, these are just as tasty and a great way to use the so delicious lentils!!
Yes, I like fruits, veggies, and all the grains!! Chickpeas and lentils are my favorites, along with white beans, oh so creamy white beans, but these are coming in another recipe on a following post. Today is the lentils’ day!
Smoked Cheddar and Lentil Burgers are very flavorful; I like the addition of sautéed onions and carrots (which I usually grate instead of chopping) and the smoked cheese helps in binding together the lentils while lending its particular smoky flavors to the patties. Yum.
These “burgers” are very tender and delicate; so you have to be a little gentle when flipping them over in the pan, also let it get a nice crust (without burning, of course!) on the bottom before you flip, it helps to hold the burger together. Also, I like to dredge the patties in breadcrumbs before pan-frying, it helps hold them together a little better, plus it adds a nice thin and crunchy crust to the outside. Oh, and I usually try to make the mixture a day in advance, and then the next day I form the patties (dredge in breadcrumbs) and cook them, I find the chilled mixture easier to work with.
The smoked cheddar gives a pronounced flavor and add a lot to the taste of these burgers, so if you can find it by any means use it, but if not available then regular cheddar makes a great substitute (I have done this before!).
I usually have these burgers in a plate accompanied by a salad and brown rice, but today Matheus insisted on having his on a bun, so we tried that. I have to say it didn’t work quite well as eating in a plate, with each bite the burger ended up being squished in between the bun and started to came out of the sides… not sure if it was just the burgers (they are a little soft), as Matheus was not very delicate while eating it either!
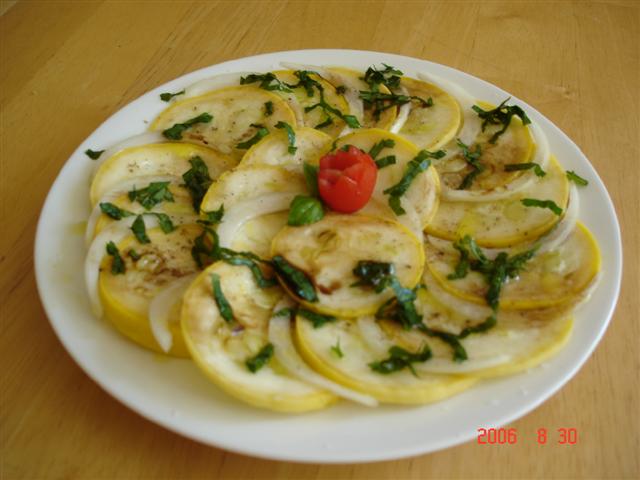
As a side we had a “Yellow Squash Carpaccio” that I put together right before lunch in a pinch: thinly slice the yellow squash and some onion, arrange them on a plate, sprinkle salt, pepper, chopped parsley and basil, drizzle with some olive oil and balsamic vinegar, and enjoy!! It turned out very yummy!!
Ana


Smoked Cheddar and Lentil Burgers (CL June 2003)
2 1/2 cups water
1 cup dried lentils
2 bay leaves
1 teaspoon olive oil
1 cup finely chopped onion
1/2 cup finely chopped carrot
1 cup (4 ounces) shredded smoked cheddar cheese
1/2 cup dry breadcrumbs
2 teaspoons chopped fresh thyme
1 1/4 teaspoons salt
3/4 teaspoon garlic powder
3/4 teaspoon paprika
1/2 teaspoon freshly ground black pepper
1/4 teaspoon ground red pepper
3 large egg whites, lightly beaten

Place first 3 ingredients in a medium saucepan; bring to a boil. Cover, reduce heat, and simmer 30 minutes or until tender; drain. Discard bay leaves. Place lentils in a large bowl; partially mash with a potato masher. Cool slightly.
Heat oil in a medium nonstick skillet over medium-high heat. Add onion and carrot; sauté 5 minutes or until tender. Cool slightly.
Add onion mixture, cheese, and next 8 ingredients (cheese through egg whites) to lentils; stir well to combine. Cover and chill 45 minutes. Divide mixture into 8 equal portions, shaping each into a 1/2-inch-thick patty.
Heat a grill pan coated with cooking spray over medium-high heat. Add half of patties, and cook 5 minutes on each side or until done. Repeat procedure with remaining patties.
Yields: 8 burgers.

Yellow Squash Carpaccio!

Monday, August 28, 2006

Aren't these pretty??? And so tasty... Love tomatoes!!
Ana
A different take on Pesto Sauce

When I saw this recipe at Karen's blog I almost instantly thought it would be a good one. Some of my favorite ingredients were mixed up in this recipe and I could almost taste it myself as I was reading through.
Pesto alla Trapanese was a great twist on pesto pasta. I was more than right when I copied the recipe and put on top of my list to try, this sauce was really delicious, even more than I imagined myself.
Although the color was not the prettiest, the ingredients' tastes in this sauce blended so nicely together that a bunch of flavors invaded each mouthful of pasta as I ate. I could taste the tomatoes, both fresh and sun dried, the garlic, the basil, and the oregano, all together and as a ingredient by itself. It was almost like every bite of it had a hint of flavor of one of the ingredients. I don't know how to describe it, but it worked very well for us, it was approved and we all liked it here at home!
The cheese gives a balanced saltiness to the sauce, just enough to complete the goodness. The only ingredient I didn't think added much in terms of flavors was the almond, but I am guessing I may not have used enough of them, as I didn't actually measured my ingredients. They sure added some texture, I could tell there were nuts in there, but not enough flavor to be identified by my taste buds in one bite.
A nice combination of simple and typical ingredients we may have at home, a great sauce for our usual Sunday's pasta dish; it will definitely be repeated around here!
Thanks Karen, for another great recipe!
Ana

Pesto alla Trapanese (from the book Crazy Water, Pickled Lemons)
4 plum tomatoes, chopped
4 pieces sun-dried tomato, finely chopped
3 garlic cloves, chopped
75g blanched almonds
a good handful of basil leaves
leaves from 4 sprigs oregano
salt and pepper
75ml extra virgin olive oil
55g pecorino cheese, grated

To make this in the food processor simply put all the ingredients, except the olive oil and pecorino, into the bowl. Process it using the pulse button, adding the oil as you do so. Otherwise you can make it in a mortar and pestle. It should be coarser than Pesto Genovese. Stir in the pecorino, check the seasoning and serve on pasta.
Note: since I don't have a food processor I made mine in the blender, added all the ingredients and then the oil. It was quite thick, but seemed to blend fine.

Friday, August 25, 2006

Baked Eggs in Tomato Cups

A simple but fun recipe to make with kids, and adults too! Matheus likes boiled eggs, go figure, cause he would not touch eggs until he was 3 ½, plus neither the husband nor I are fans of eating pure eggs… However, last year he discovered “quail eggs” in Brazil and just decided he really liked boiled eggs, so now I usually make it for him at least once a week (either quail or chicken ones).
I came across this “recipe” (which I find to be more of an idea - I didn’t use exact measurements of cheese and herbs) in the latest issue of Vegetarian Cooking magazine, and as soon as I saw it I knew I was going to make for him, especially because he has a “tomato plant” that he is taking care of and last week we got about 6 nice and ripe tomatoes from his plant – homegrown tomatoes are the absolute best!
So we made the tomato cups and he loved it! Super easy to make, and actually pretty taste too, with the cheese and herbs it was a nice change for a plain (and sometimes boring) egg.
The tomatoes held its shape nicely and the egg was perfectly cooked inside it. I left ours for about 30 minutes, because Matheus likes firm yolks, but I actually prefer the yolk a little runny and will take mine out earlier next time! (Oh yes, because Matheus already asked for a repeat!)
Ana

Baked Eggs in Tomato Cups (Adapted from Vegetarian Times magazine)
8 tomatoes
8 eggs
1/3 cup grated parmesan cheese
1 teaspoon dried herbs (oregano, basil, sage)

Preheat oven to 425F. Slice tops of tomatoes, scoop out seeds and pulp. Place tomatoes in shallow baking dish and sprinkle cavities with salt, pepper and pinches of cheese.
Crack one egg inside each tomato. Sprinkle with salt, pepper, herbs, and remaining cheese. Bake 20 minutes for soft yolks, 30 minutes for hard yolks. Serve immediately. Serves 8.

Wednesday, August 23, 2006

Falafel Burgers

You know when there are some times when it seems everything goes wrong with all you do, no matter what you do? Well, this past week it was like this with me. Nothing was coming out right, with everything I tried something seemed to hold me back and I could not get 100% of it, even in the kitchen I had a few disappointments. And that is why I haven’t come here for a while… not much inspiration to sit and write, or cook.
Of course I have been cooking, as I need to feed everyone in the house, but not many complex recipes came out of the kitchen in the past few days, I decided to keep it simple and get happy with what I could!
So, I just hope things get better from now on. Sorry about the rant, and now lets keep cooking, shall we?
As I said, I did cook a few things last week, and still have a good amount of recipes and pictures to share here, but mostly I kept things easy, pasta salads, wraps, jell-o for dessert, see, easy, but tasty nonetheless!
One recipe I tried and really enjoyed was for Falafel Burgers that came on this month’s issue of Cooking Light. Super easy to make, and I liked everything about it, especially the use of one of my favorite ingredients: chickpeas!
They tasted great, the parsley and garlic came through without being overpowering, as did the cumin (I omitted the coriander). The texture was also very pleasant; falafels have a coarser texture due to the use of soaked chickpeas, but since this recipe calls for canned chickpeas the burgers turned out smooth and creamy inside, contrasting with the nice crunch that the bread crumbs provided to the outside.
I really liked these and will definitely be making them again! I love chickpeas and this was a delicious way of using it. And I know this may not sound good but… I actually liked these better than the falafels I once got at a local Mediterranean store. Good for me; I can have them anytime I want!
The magazine showed these being served in pita breads together with lettuce, tomatoes, and a tahini sauce, but I just skipped all that and we had ours with vegetables and rice. But in case you would like to see the full recipe, take a look here.
Hope you like them too!
Ana

Falafel Burgers (Adapted from Cooking Light Magazine)
1 cup chopped red onion
1/2 cup chopped fresh parsley
2 tablespoons fresh lemon juice
1 teaspoon ground cumin
1 teaspoon ground coriander
1/2 teaspoon salt
2 (15 1/2-ounce) cans chickpeas (garbanzo beans), drained
4 garlic cloves, minced
1/2 cup dry breadcrumbs, divided
4 teaspoons olive oil, divided

Combine 1 cup onion and next 7 ingredients (through 4 garlic cloves) in a food processor, and process until smooth, scraping sides of bowl occasionally. Place bean mixture in a large bowl; stir in 1/4 cup breadcrumbs. Divide bean mixture into 6 equal portions, shaping each into a 1/2-inch-thick patty. Place remaining 1/4 cup breadcrumbs in a shallow dish. Dredge patties in breadcrumbs.
Heat 2 teaspoons oil in a large nonstick skillet over medium-high heat. Add 3 patties to pan; cook 3 minutes on each side or until browned. Repeat procedure with remaining 2 teaspoons oil and patties.

Tuesday, August 15, 2006

Millet Muffins

If there is a kind of baked good you will get tired of seeing here, its muffins! I never get tired of them, and fortunately, nor does my boys. I make muffins every week, sometimes even twice a week, keep them frozen and there is always someone having muffins for breakfast or snack everyday at our home. And I love baking muffins!!
The recipe I am posting today comes from the allrecipes website, but I first saw it at my friend’s Karen blog.
Millet muffins turned out a very simple, basic recipe that you can easily be creative with by adding your favorite ingredients, such as dried fruits and/or nuts. I liked the texture that the millet added a lot, a little crunch here and there, simple yet delicious, plus these are not too sweet. The honey added just enough sweetness to the batter, and its flavor was my son’s favorite point of the muffin; he likes to sweeten his fruits and even milk with honey!
I thought they were good but could be improved, so next time I make I will definitely add some dried fruits to them, but to my surprise even my husband liked them as is, so I guess either we are getting “healthier” around here or these are really good muffins!
So, I leave here the recipe and will let you play with them, any further ideas to make them even better will be very welcome! Oh, and I loved their color too, they came out so pretty with nice golden domes adorned by the millet’s little freckles, kind of cute!
This was my first time using millet, and I liked it a lot, so you guys can expect some more experimentation with it, recipes to come!
Ana

Millet Muffins
2 ¼ cups whole wheat flour
1/3 cup millet
1 teaspoon baking powder
1 teaspoon baking soda
1 teaspoon salt
1 cup buttermilk
1 egg, lightly beaten
½ cup vegetable oil
½ cup honey

Preheat oven 400F.
In a large bowl mix flour, millet, baking powder, baking soda, and salt. In another bowl mix the buttermilk, egg, oil, and honey. Pour buttermilk mixture into dry ingredients, stirring just until moist. Transfer batter to greased muffin tins. Bake for 15 minutes or until toothpick comes out clean.

Note: the recipe states it makes 16, but I got 12 out of it. I like my muffins not too small and with round tops!

Monday, August 14, 2006

Strawberry Panna Cotta

My favorite texture for food is “creamy”, for both sweet and savory; if the word creamy is used to describe it, then I know I am probably going to like the dish!
Dessert for me don’t need to be big, actually I like the small ones, like a small square of chocolate, or a piece of fruit with some adornment on it (covered in chocolate, a little honey on top… you got the idea). When fruit and creaminess are combined, then you are talking to me!
I absolutely love chocolate in all forms, and chocolate ice cream is definitely one of my top choices for sweets, but there is another creamy dessert that also makes me drool every time I see a picture or just think of it, and that is Panna Cotta.
So good, creamy, simple and delicious, there is not much to say about it, just that it is super easy to make and you can’t believe how good a dessert you get after just a bit of mixing and stirring.
Therecipe for Yogurt Panna Cotta is still my favorite, but I also like a recipe for Strawberry Panna Cotta that I found on Epicurious, it is light and very good.
I have made that recipe a couple of times already, but yesterday I decided to make it again with a few changes of my own. I used mostly drained yogurt (or greek yogurt, take a look here, this yogurt is the best!) and buttermilk in place of milk and cream. The end result was very creamy with a smooth texture to it. The epicurious recipe seems to be even lighter than mine, more silky I would say, mine was a little denser due to the higher amount of yogurt, but delicious just the same!
I love yogurt and this was a great dessert for a hot afternoon, everyone enjoyed it here. I served ours with macerated strawberries, as I believe that keeping it simple is the best way to enjoy panna cotta, it is yummy just as is!
Today, I am posting here is my version in case you want to try, enjoy!
Ana

Strawberry Yogurt Panna Cotta
3 cups chopped strawberries
1 ¾ cups drained yogurt
3 tablespoons sugar (Or more to taste)
2 ½ teaspoons unflavored gelatin
½ cup buttermilk

Blend strawberries, yogurt, sugar, and buttermilk. Pass mixture through a sieve to strain the solids and seed bits. Reserve mixture into a bowl.
In a small saucepan sprinkle gelatin over 3 tablespoons water and let it bloom for 2 minutes. Put saucepan over low heat and warm it up just until the gelatin dissolves, do not boil.
Mix gelatin into strawberry mixture, until well incorporated. Pour panna cotta mixture into 6 small ramequins (4 oz each), let it chill in the freezer until ready to serve, about 6 hours or overnight. Serve with macerated strawberries (chop a few strawberries, mix with some sugar and let it sit for 30 minutes or so. The strawberries will release their juices and a delicious “sauce” will form, yum!)

Thursday, August 10, 2006

Watermelon

You know when someone asks you “what is your favorite food”? Well, I don’t have to think twice to answer that. Usually people would reply by naming one or two prepared dishes, not me; my favorite food of all times is watermelon. That is it; no need for cooking, baking or grilling it outside, just a big piece of fresh and juicy watermelon says it all!
It is my favorite fruit, food, dessert, I love watermelon, especially the sweet ones we got during summer, no wonder I love this season so much. A big hunk of cold watermelon is the most refreshing treat during the summer days, you grab yourself a piece and get prepared, because if it is a good one it may get messy.
When I was young, at my grandmother’s house, we would always go eat our fruits in the backyard, just so that we would not mess up the kitchen too much. The fruits in Brazil were the best ones, always ripe and juicy, and were usually served whole (in case of mangoes, oranges, etc), or in big slices and chunks as it is the case with watermelon and other bigger fruits. The juices would run through our hands and arms (mangoes were the best for this!), and there we were, sitting outside, savoring the best and sweetest fruits, and having the most fun together by licking ourselves and spiting out the seeds… I did have fun when growing up!
Since then Watermelon has always been my favorite, although nowadays I eat it in the kitchen and usually in cut up pieces… not so much fun, but it is not the same without my grandmother’s backyard anyway.
I love summer and go through a few whole watermelons during the season, and believe it or not, I eat most of it all by myself! Matheus also likes watermelon, but at the end of the season he starts to get tired of it, well, I don’t!
Watermelon is not something that goes well with everything, and is hardly a food that appears in many different dishes. Nowadays I have seen it used in savory salads, paired with green leaves and salty cheeses (such as feta, or goat cheese), but until recently it was mostly consumed as is, or in fruit juices.
I like my watermelon pure and simple, or blended with mint leaves to make a refreshing summer drink, those are my two favorite ways of having it. Nothing beats a good piece of watermelon to me!
Today I actually mixed up watermelon with a cantaloupe melon that we got from a friend and have been hanging around for a while (screaming to be used up!). I made little balls of them, using a melon baler, and then tossed with some sugar and mint leaves, yum!
Super refreshing, no work at all (besides balling them, which was actually fun!), a great summer treat that kids and adults will certainly enjoy. Not to mention that watermelon is very healthy and good for you too!
Ana


Watermelon and Cantaloupe “Fruit Salad”

Watermelon balls
Cantaloupe balls

Sugar, or sweetener of choice, to taste

Mint leaves to taste

Toss everything together and sweeten to your taste. Leave in the fridge for a couple of hours so the flavors can meld. Serve cold!
Note: you can also use sugar syrup or honey as sweeteners for this, both pairs up nicely with the mint. However, depending on the ripeness of your fruit you may not need to sweeten it at all!

Yummm!!!

Wednesday, August 09, 2006

Brownie Bites

Today’s recipe is basically an idea to be made with your favorite brownie recipe, nothing really special here, but let me tell you, this was a huge success with the kids the other day!
Matheus is having some fun these past couple of weeks at the YMCA Summer Camp program, he made a lot of new friends and the environment there is so healthy and friendly, he loves playing and going to the pool at the camp. They have got all this “counselors” that take care of the kids, and the best thing is that they are kids themselves! The counselors’ age range around 17 years old, so they have extra energy to deal with the kids, it is fun to see them play. But enough with that, lets get to the cooking part of the post.
Last week they had a cookout at summer camp, and Matheus’ huddle was supposed to contribute with desserts. I wanted a treat that would be easy to eat, that the kids could grab and go, and preferably something not very messy. Since I believed that there would be a good amount of cookies showing up (and I was certainly not wrong!), I discarded that possibility and went looking for something else instead.
The thought of mini muffins came to my mind, and suddenly brownies popped up. That’s it, Mini Brownies, perfect!
Great idea, they came out very good looking and cute too. The kids loved them, it was super simple and easy to make, plus with all the chocolate goodness and the yummy chocolate chips inside there was no need for messy frostings or the like. Matheus loved taking this to the camp, so I will probably be making more of them during the next preschool year to share with the friends.
As I said before, you can make this with your favorite recipe (make sure to not over bake them so they came out nice and fudgy inside), but I am posting here the recipe I used just in case, and you know what, if you like brownies this is worth trying, it was very good! (Especially warm out of the oven… oh the goodness of melted chocolate, yum!!)

Ana


Brownie Bites
½ cup cocoa powder

1/3-cup oil (I used canola oil)

1 cup sugar

2 eggs

1 teaspoon vanilla extract

2/3 cup flour

1 teaspoon baking powder

¼ teaspoon salt

1/3 cup chocolate chips

Preheat oven to 350 F and either line with paper or grease 24 mini muffin tins.
In a large bowl mix all ingredients together, adding the chocolate chips at the end. Pour batter into prepared mini muffin cups (don’t fill them too much!). Bake for about 16 minutes. Makes 24.
(Recipe adapted from the Hershey’s website)

Tuesday, August 08, 2006

Grilled Salmon

Keeping with the grilling theme, our Sunday lunch was also prepared outside, or at least part of it. Besides being healthy, we all like fish here so I try to make it at least once a week. Usually I end up cooking white fish fillets (like tilapia, our favorite), but sometimes I do enjoy having salmon. We should probably have it more often though as it is such a healthy fish, but the husband is not very fond of it and unfortunately, and I don’t know why, my organism doesn’t seem to handle it very well. Every time I eat salmon it seems a little heavy on me and very hard to digest, but I do like salmon, so I keep trying.
Grilled Salmon with Mustard and Herbs is a great way to prepare salmon, we all loved it and I will definitely be using this cooking/grilling method more often, will definitely try with other fishes.
You simply put the fish on aluminum foil and slide it, foil and all, on top of the grill. Simple, no mess, easy clean up, and best of all: no fishy smell inside!! Yay! (I hate making salmon inside, the fish smell seems to penetrate all the pores in the house and I can smell it for days)
The herb/mustard mixture was delicious and did infuse the fish with its flavors; Matheus loved the fish and the husband said it was “herby and very good”, and I totally agreed with them!
I was afraid the mustard would overpower the flavors but it didn’t and its taste was very subtle, I might even increase the mustard amount a little next time I make it.
A very tasty dish, super healthy and good for you too!! Yum!
Ana

Grilled Salmon with Mustard & Herbs
2 lemons, thinly sliced, plus 1 lemon cut into wedges for garnish
20-30 sprigs mixed fresh herbs plus 2 tablespoons chopped, divided
1 clove garlic
1/4 teaspoon salt
1 tablespoon Dijon mustard
1 pound center-cut salmon, skinned (see Tip)

Preheat grill to medium-high.
Lay two 9-inch pieces of heavy-duty foil on top of each other and place on a rimless baking sheet. Arrange lemon slices in two layers in the center of the foil. Spread herb sprigs over the lemons. With the side of a chef's knife, mash garlic with salt to form a paste. Transfer to a small dish and stir in mustard and the remaining 2 tablespoons chopped herbs. Spread the mixture over both sides of the salmon. Place the salmon on the herb sprigs.
Slide the foil and salmon off the baking sheet onto the grill without disturbing the salmon-lemon stack. Cover the grill; cook until the salmon is opaque in the center, 18 to 24 minutes. Wearing oven mitts, carefully transfer foil and salmon back onto the baking sheet. Cut the salmon into 4 portions and serve with lemon wedges (discard herb sprigs and lemon slices). Yields 4 servings.
Adapted from Eating Well magazine

Monday, August 07, 2006

Grilling!

Besides being the best season of the year for fresh produce, summer is also the best time to cook outdoors, and as good Brazilians we love to grill!
The husband loves grilled meat, or “churrasco” as we call it in Brazil, so when the weather starts to warm up he already sets up outside and we basically have grilled meat every weekend. This Saturday was no different and with a nice sunny day we headed outside to make our meal.

Grilling is great because all the smells and smokes stay outside and we don’t get as many dishes dirty as when we cook indoors, so it is always a bonus to heat up the fire outside.

Normally we only season our meat with coarse sea salt, that is what “carne assada” is all about to us, but this weekend we decided to experiment with a recipe that came with the latest issue of Cooking Light.

Grilled Herb Steak was a nice change to our basic grilled meat and it turned out very flavorful due to the fresh herbs combination. As usual I didn’t follow the recipe to the t (I can’t control myself, I am always changing or sub something!) and used the herbs we had available at our backyard. Well, that is what cooking is all about, right?! At least it is to me, you get the inspiration from the recipe and if necessary simply adapt it to suit your tastes and/or the availability of your ingredients.

We used fresh thyme, oregano, parsley, and basil, and rubbed the mix on a big piece of sirloin instead of using already cut steaks. I believe you can make it with any of your favorite beef cuts, although the magazine recommends ribeye – we used sirloin, which happens to be our favorite meat for grilling. Just be sure to adjust the salt, in case your steaks are bigger/smaller.

I also grilled some corn on the cob and chicken (my all time favorite!!!) seasoned with salt, pepper, olive oil and lemon juice, simple but delicious! To complement it all I made a tomato salad/salsa (called “vinagrete” in Brazil) and a small appetizer salad with cherry tomatoes, fresh mozzarella and basil leaves “skewers” on a bed of spinach, doesn’t that look cute? I loved my idea!

Hope you enjoy some grilling too, we sure do like summer here!!

Ana

Isn't this cute?!!!


Grilled Herb Steak
2 tablespoons fresh thyme leaves, minced
1 tablespoon fresh oregano leaves, minced
1 teaspoon fresh rosemary leaves, minced
1 teaspoon dried marjoram
1 teaspoon dried lavender buds
1 large garlic clove, minced
4 (8-ounce) steaks
1 teaspoon salt
1/2 teaspoon freshly ground black pepper
Cooking spray

Combine first 6 ingredients in a small bowl. Rub both sides of steaks with herb mixture. Place steaks in a shallow dish; cover and refrigerate 4 hours.
Remove steaks from refrigerator. Sprinkle both sides of steaks with salt and pepper; let stand at room temperature 20 minutes.
Prepare grill.
Place steaks on grill rack coated with cooking spray; grill 2 minutes on each side or until desired degree of doneness. Remove from grill. Cover steaks loosely with foil; let stand for 5 minutes.

Yield: 4 servings (serving size: 1 steak)
Adapted from Cooking Light, AUGUST 2006

My favorite, grilled chicken, yum!!!

Sunday, August 06, 2006

Another Chocolate Gelato

I know I have posted a chocolate gelato already this past month, but I tried another recipe last week and just had to come share this one too.
The previous recipe is good, light and tasty, one of the favorites here at our home, but if you are a real chocoholic like me then you will leave that one for the kids and go for this new one instead.
Now this is serious Chocolate Gelato, realy, realy, realy good ice cream stuff, by far the best chocolate ice cream recipe I have made and one of the best I have ever had. It is rich and chocolaty, smooth and creamy, simple and absolutely the best!
The previous recipe got its flavor from melted chocolate and a little bit of cocoa powder, on the other hand, there is a lot of cocoa in this rich gelato, and that is what makes it so good, it is pure chocolate flavor in creamy and cold deliciousness. I really loved this one!!
Also, the other best thing about this is that it did not get icy after being in the fridge for a couple of days, it kept super well, smooth and creamy just as when consumed the first day.
I first saw this recipe at Nic’s blog, Baking Sheet, and drooled just by looking at her picture. I knew right away it would be my kind of dessert, and I am glad I tried it early in the summer, because I am already going to whip up some more!
My picture however doesn’t make justice of the goodness involved in this dessert, but you can certainly check out her post and picture here.
The recipe comes from a great book called “Bittersweet” by Alice Medrich, which I actually borrowed from the library to check out and has tons of mouth watering chocolate recipes and pictures; a nice book to take a look if you are into chocolate desserts.
This Chocolate Gelato is not as dense as ice cream, but it is rich enough that you may not need much to satisfy your chocolate cravings, and even though I am the biggest chocoholic here both Matheus and the Husband enjoyed this one a lot too. And as Matheus says “chocolate ice cream is the best”! Oh yes, I am all with him!!
Really, if you like chocolate, give this a go, it is amazingly good!
Thanks Nic for giving the heads up on this one!
Ana

Sicilian Chocolate Gelato
(Adapted from Bittersweet by Alice Medrich)
3 cups milk
2/3 cups sugar
¾ cups unsweetened cocoa powder
1 ½ tablespoons cornstarch

In a medium saucepan, bring 2 cups of the milk to a simmer over medium heat.
Meanwhile, whisk the remaining 1 cup milk with the sugar, cocoa, and cornstarch in a small bowl. Add the cocoa mixture into the hot milk and cook, stirring constantly, until the mixture thickens and bubbles a little at the edges. Cook for 2 more minutes, pour mixture on a bowl and let it cool. Cover with plastic wrap and chill it overnight. Freeze in ice cream machine according to its instructions.

Saturday, August 05, 2006

Coconut Flan

This is one of the simplest recipes I have ever made and eaten, however, it is one of my favorite desserts. There is no secrets when preparing Coconut Flan, simply whirl everything together in the blender and pour on your favorite mold, nope, no baking or cooking here, in the fridge it goes. A few hours to help it set up in the ice box and you have got yourself a creamy coconut flavored flan, so delicious you will not believe how easy it was to make.
This recipe is pretty popular in Brazil and there people love to caramelize their mold, however it is not necessary doing so if you don’t want to. I personally, as a creamy dessert person, like the custard by itself, but the caramel sure does add some flavor and makes it look prettier too, so the choice is all yours!
You can put this in a ring mold, a jell-o mold, whatever you have; it can even be chilled in ramekins for individual portions, and even though I haven’t tried yet, I believe some fruit sauce might go well with here too – instead of the caramel that is.
There are no rules, just the enjoyment of something easy and simple, but flavorful nonetheless.
Enjoy!
Ana

Just a quick note: take a look at the sidebar; I finally got around to creating my Recipe Index, yay!! Now it will be much easier to browse the posted recipes!

Easy Coconut Flan
1 can sweetened condensed milk
1-cup coconut milk
1-cup heavy cream
1 envelope unflavored gelatin
½ cup water

In a small sauce pan sprinkle gelatin over the water, let it bloom for a couple minutes and then warm it up over low heat until it dissolves, don’t let boil.
Put the other ingredients on a blender and process until smooth, add the dissolved gelatin and blend until incorporated. Pour the mixture over a gelatin or ring mold and put it in the fridge until set up, about 6 hours, or overnight.

Note: you can caramelize your mold if you want to (just make sure it is heat resistant!), for this simply warm up to a cup of sugar in a small sauce pan over medium-high heat, just until it takes on a light amber color. Pour caramel over mold and let it set. I usually caramelize my mold before I start blending my flan, that way the mold is ready and cooled when I need it.

This one was made using red unflavored gelatin, I liked the pink color, it was so pretty!

Tuesday, August 01, 2006

Fig Muffins

We have our list of favorite muffin recipes here at home, but since I like muffins quite a lot I am always experimenting with new recipes. Fig is a delicious fruit, which I always had fresh when growing up, and just recently I came across and actually tried the dried ones. Don’t have to say that I like it, as I do love most fruits! And basically the same is true with their dried counterparts, I like most of them, figs included.
This recipe, Oat-Topped Fig Muffins, was a very nice surprise; the muffins came out delicious in all kind of senses. They are hearty and sort of dense, but not too much that they still have some lightness to it, and the figs blended into the mixture gives enough of its flavor without making the muffins overly sweet.
Be sure not to over process the liquid mixture though, just so that you get little pieces of the figs in the batter, they were the best part!
My only complain is that I found the topping to be a little on the sweet side (even my son commented on that, and he like his sweets), so if I make them again I will definitely decrease the sugar, if not omit the topping completely. Some people might think it is the best part, but to be quite true I am not very fond of streusels on my muffins, they are usually super sweet and sometimes messy - falling off the muffins all over the place. In my humble opinion, good muffins don’t need topping/streusel at all; they should be perfect just by themselves, but that is just me.
“Streuseled” or not, these fig muffins have a nice balance of flavors, it was a nice change for our usual morning muffins, we all liked it here and it will probably be made many other times!
Enjoy!
Ana

Oat-Topped Fig Muffins
1 1/2 cups all-purpose flour
1 cup whole wheat pastry flour
1/2 cup sugar
1 teaspoon baking powder
1 teaspoon baking soda
1/2 teaspoon salt
1 1/2 cups buttermilk
1 1/4 cups chopped dried figs
2 tablespoons canola oil
1 teaspoon vanilla extract
1 egg
Cooking spray
1/3 cup packed brown sugar
1/4 cup quick-cooking oats
1 tablespoon butter, melted

Preheat oven to 400°.
Lightly spoon flours into measuring cups; level with a knife. Combine flours and next 4 ingredients (through salt) in a large bowl; stir with a whisk. Make a well in center of mixture.
Place buttermilk, figs, oil, vanilla, and egg in a food processor; process until well blended. Add fig mixture to flour mixture, stirring just until combined. Divide batter evenly among 12 muffin cups coated with cooking spray.
Combine brown sugar, oats, and butter in a small bowl; toss with a fork until combined. Sprinkle oat mixture evenly over muffins. Bake at 400° for 18 minutes or until a wooden pick inserted in center of a muffin comes out clean. Cool in pans on a wire rack for 5 minutes; remove muffins from pans, and cool completely on rack.

Yield: 12 muffins (serving size: 1 muffin)
Cooking Light, March 2006