HO HO HO!!!
We are going to travel to another city, Tiete, where both my parent's family and my husband's family live. I am not going to have much access to internet there, so before we leave I wanted to come here and wish all my friends and those who visit my blog a Very Happy Christmas and a Great Begining of 2006! Thank you all for coming and visiting me in this space, which I love and where I came to meet lots of nice people!
Love you all!
Ana
Thursday, December 22, 2005
Monday, December 12, 2005
 Lots of fresh fruits and vegetables!
That’s the best thing about coming to Brazil, the wonderful produce they have around here! Super fresh, direct from the growers, not to mention the price... it can’t be beaten!
We are having lots of fun with the family here, plus we are savoring the beste and sweetest fruits you can imagine! Mango, papaya, guava... yum!! And the best place to get fresh produce here are the street markets, which we call “Feira” (in English it would be the equivalent to “fair”).
Once a week they close a specific street for the morning hours and very early in the morning the produce growers start to assemble their “tents” in order to display the most varied assortment of fruits and vegetables you can possibly imagine. There you can find from fruits and vegetables to herbs and spices that they will freshly and happily ground for you (with a manual miller). You can also find freshly made cheeses, nuts, snacks, and even toys and kitchen gadgets in there.
There are tons of markets all around town, and basically each area has its own market in specific weekdays. Near my mom’s house there are two, one on Fridays and another one on Sunday.
It is definitely not the most pleasant place to go, but the freshness of the produce makes it worth to check out. Friday we went to one, my son was a little confused among all the people and the noisy vendors, who keep yelling the silliest things to get your attention, but enjoyed sampling fruits and choosing veggies for our lunch later on!
I wanted to take some pictures but forgot my camera, so I used my sister’s cell phone instead. Here is just a small sample of what they have, and next time I will try to remember to capture the favorite snacks you will find in the "feira": “Pastel” (a fried pastry concotion) and Freshly Squeezed Cane Juice!
Ana


Thursday, December 08, 2005
 Brazil!
Just posting to tell you all that we are here, safe and sound!
The trip was nice and Matheus had lots of fun in the airplane! We had some delay, missed a connection, and the baggages only got here a day after we did, but other than that everything was ok and now we are enjoying the family!
Not much to write today, and I haven't been on the computer much, but I will come back with pictures and news. There is still a lot to do, talk, and tons of good food to eat!
See you soon!
Ana
Sunday, December 04, 2005
 It is tomorrow….
Yes, it is tomorrow, we are going to Brazil!!!
I have been meaning to come here and post the recipes I have made during the week, but with all the packing, laundry, Christmas shopping, and a few other things I had to get done before going, I simply did not have much time left to post.
But here I am, ready to go! Everything is done and now I just have to be organized and put everything together before we leave. Until tomorrow I will probably find out that something is missing, or that I forgot something important, but I will leave to worry about this part later.
Now on to my favorite subject… Food!!
I had a pretty busy week but still managed to cook and even try new recipes, cooking for me is like a therapy so nothing better than heading to the kitchen after a stressful day. Thursday I decided to make muffins to leave for the husband’s breakfasts during the weeks he will be here alone. He requested banana bran muffins and strawberry muffins, and I also made my new favorite oatmeal muffin (the one from Nic’s site, posted here before!), believe it or not, we were in a muffin mood this week and about half of them is already gone… seems I will be making one more batch before leaving!
I also made an asparagus soup that was very good! I know, it is not asparagus season right now, but I found some frozen asparagus spears for the first time when shopping at whole foods during the week, I was extremely happy with my finding and since it was cold I decided to make soup. Very easy recipe and very good too, and you can vary the vegetables accordingly to what you have on hand.
Another recipe I made was for potato rolls, and this was a new one. I have had this recipe on my “to try pile” for years, and although it looked like a good one (it had a picture with it, which I like!) I had not made it before. And I have no idea why I waited so long, because the rolls were awesome! Simple but so good, they had the perfect texture of the potato rolls we buy at bakeries in Brazil, which usually come filled with a creamy cheese called “catupiry”. Well, I did not have the cheese here so I improvised and stuffed them with small pieces of those laughing cow triangles (Brazilians, read “ polenghinho”). It worked very well and the rolls were delicious! The recipe is in Portuguese, so if you want it just let me know and I will be glad to translate!
Recipe for the rolls can be found here: http://cybercook4.uol.com.br/exibir_receita.php?codigo=486
Friday night we had Cheese Fondue! What can be better than melted cheese in a cold night, huh?! So good, and very easy to make too! I always make the same recipe, which I got from foodtv. As with usual fondue it is made with wine, but since Matheus was eating with us I made ours with chicken broth, instead (you can use milk too). I turned out very good, but if you have no kids for dinner by any means use the wine!
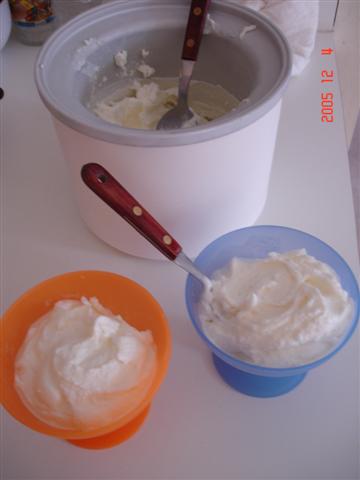
Finally, today after our obligatory “Sunday Pasta”, we had Cheesecake Ice Cream! This is actually a recipe I created after browsing different other recipes. As I have told you before, the husband loves cheesecake, and I love ice cream, so during the summer I developed this recipe in an attempt to combine both our likings and create one concoction we could happily enjoy together. It worked, we were all happy and now I share my recipe with you! Today I had some cream cheese left that I needed to use, so I made the recipe again, however, I did not have half-half on hand and used plain whole milk yogurt instead, which worked nice! The recipe is super easy to make and makes a creamy and delicious ice cream!
That is it for today. Have to finish up cleaning and getting everything in order for the husband before we go tomorrow. And I promise I will write from Brazil and try to post some pictures. Whish me a good trip!
See you soon, and enjoy the recipes!
Ana

Cream of Asparagus Soup (Cooking Light, April 2002)
3 cups (1/2-inch) sliced asparagus (about 1 pound)
2 cups fat-free, less-sodium chicken broth
3/4 teaspoon fresh thyme, divided
1 bay leaf
1 garlic clove, crushed
1 tablespoon all-purpose flour
2 cups 1% low-fat milk
Dash of ground nutmeg
2 teaspoons butter
3/4 teaspoon salt
1/4 teaspoon grated lemon rind
Combine asparagus, broth, 1/2 teaspoon thyme, bay leaf, and garlic in a large saucepan over medium-high heat; bring to a boil. Reduce heat, cover, and simmer 10 minutes. Discard bay leaf. Place asparagus mixture in a blender; process until smooth.
Place flour in pan. Gradually add the milk, stirring with a whisk until blended. Add puréed asparagus and ground nutmeg; stir to combine. Bring to a boil. Reduce heat; simmer 5 minutes, stirring constantly. Remove from heat, and stir in 1/4 teaspoon thyme, butter, salt, and lemon rind. Yield 4 servings (serving size: 1 cup).
Cream of Carrot Soup: Substitute 2 cups baby carrots for asparagus. Omit bay leaf.
Cream of Leek Soup: Substitute 3 cups sliced leek for asparagus. Substitute 3/4 teaspoon rosemary for thyme. Omit bay leaf.

Cheese Fondue (Tyler Florence)
1/2 pound imported Swiss cheese, shredded
1/2 pound Gruyere cheese, shredded
2 tablespoons cornstarch
1 garlic clove, peeled
1 cup dry white wine
1 tablespoon lemon juice
1 tablespoon cherry brandy, such as kirsch
1/2 teaspoon dry mustard
Pinch nutmeg
In a small bowl, coat the cheeses with cornstarch and set aside. Rub the inside of the ceramic fondue pot with the garlic, then discard. Over medium heat, add the wine and lemon juice and bring to a gentle simmer. Gradually stir the cheese into the simmering liquid. Melting the cheese gradually encourages a smooth fondue. Once smooth, stir in cherry brandy, mustard and nutmeg.
My Cheesecake Ice Cream
8 oz cream cheese
1 cup milk
1/2 tablespoon lemon juice
3/4 cup sugar
1/8 teaspoon salt
1/2 cup sour cream (or heavy cream)
1 teaspoon vanilla
Monday, November 28, 2005
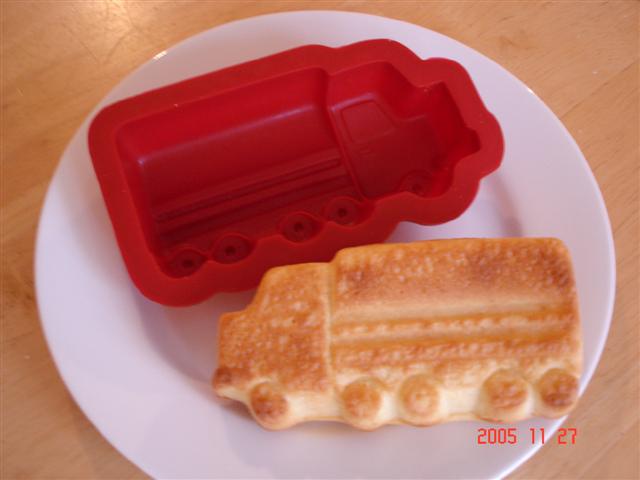 Cute truck pan…
I found this mini cake pan at a kitchen store with Matheus last week when we were walking at the mall. We both saw it at the same time and grabbed it at once; so cute we could not resist buying! (And it was only $2,50 for two pans!).
They are so cute that I had to share here with you! Matheus loved the idea of making “truck cakes” and we have tested the pan twice already this past weekend. We made oatmeal muffins in it one day and yesterday we decided to make one of my favorite and easiest cakes, Yogurt Cake! Just dump everything in the blender, mix it up and that is it, and you can use the yogurt container to measure the rest of the ingredients - one less thing to clean up! I have made this cake a zillion times and it always come out great, so simple and so good!
Normally I bake it in a bundt pan, but yesterday we baked some in the mini truck pans and the rest of the batter in muffin tins. I have even added fruits to the batter (strawberries, blueberries), and also chocolate chips. You can add pretty much whatever you like, but I like it best when it is plain. It is a very moist cake, tender and delicious. Matheus likes to add chocolate sprinkles to the batter, making what we call in Brazil an “Anthill Cake”!
Try it and I am pretty sure you are going to like it too. It is a very good cake!
Ana
Yogurt Cake
1 cup plain yogurt (one 8oz container - use the yogurt container to measure up the rest of the ingredients)
½ cup oil
1 cup sugar
2 cups all-purpose flour
4 eggs
1 tablespoon baking powder
Notes: the original recipe asks for 2 cups sugar but I find it WAY too much, I have always made it with one cup and it is plenty sweet for us, but yoy can add more sugar to suit your tastes. Also, I have made it using 3 eggs and the cake came out good.
Sunday, November 27, 2005
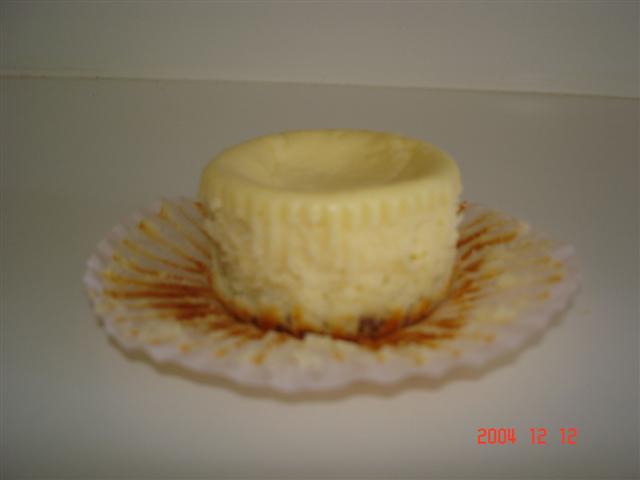
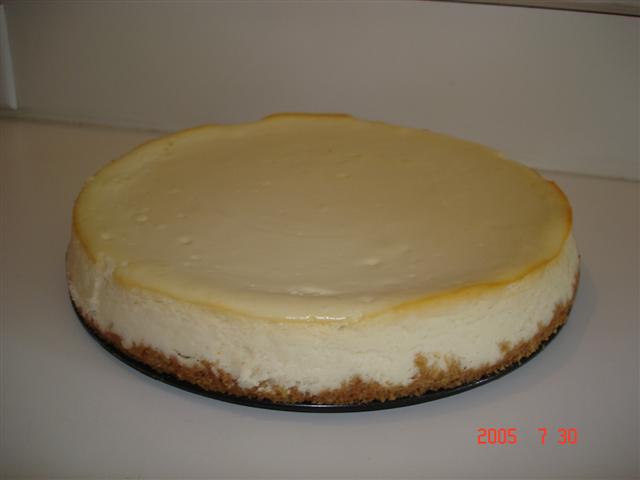 Lots of Cheesecake...
My husband’s favorite dessert is cheesecake, so I make it kind of frequently. There are so many variations for cheesecake but his favorite of all is the plain cheesecake, no sauces, no add ins, no nothing… just plain, he loves it! This weekend he asked me to make a cheesecake for him once more, so I am posting the recipe here for those of you who may like a good cheesecake too!
I have 2 recipes that I make frequently, and as with most cheesecake recipes they are both super easy to make. One of them has the basic ingredients and is very good, the other one has sour cream added to the batter and is delicious, truly the best cheesecake I have ever tasted! The best recipe is called The Ultimate Cheesecake and comes from chef Tyler Florence.
The other one… well… it comes from the cream cheese package, but is also very good! I like to make it and bake in muffin tins, so that we can freeze the leftovers and have “cheesecake muffins” for dessert during the week. The big cheesecake also freezes well, just slice it and wrap each individual slice in plastic wrap, put them into a plastic bag (or plastic container) and pop in the freezer. When ready to eat just let them out for about one hour to defrost.
Also, one of the recipes calls for baking in a water bath, but I found out that baking it without the water bath works very well. I think that the water bath makes a slightly creamier cheesecake; the one that I tested baking without the bath sort of rose in the sides and then sunk after cooled, but the flavor was just as good and everybody ate it smiling happily!
For the mini cheesecakes I use paper liners in the muffin tin, and as “crust” I use a cookie. I have tried with different cookies and the one my boys here like the best are chocolate chip cookies, but those vanilla wafers also work well. Really, any cookie you like will work, and if the cookie you choose is to big just break it a little bit around it until it fits the muffin cup.
You can add some jam on top, or even chocolate sauce to dress up your cheesecake, or if you are like my dear husband you may enjoy it just like it is, plain and delicious!
Enjoy!
Ana
The Ultimate Cheesecake (Recipe from Tyler Florence – foodtv)
Crust:
2 cups finely ground graham crackers (about 30 squares)
1/2 teaspoon ground cinnamon
1 stick unsalted butter, melted
Filling:
1 pound cream cheese, 2 (8-ounce) blocks, softened
3 eggs
1 cup sugar
1 pint sour cream
1 lemon, zested
1 dash vanilla extract
Preheat the oven to 325 degrees F.
In a mixing bowl, combine the ingredients with a fork until evenly moistened. Lightly coat the bottom and sides of an 8-inch springform pan with non-stick cooking spray.
Pour the crumbs into the pan and, using the bottom of a measuring cup or the smooth bottom of a glass, press the crumbs down into the base and 1-inch up the sides. Refrigerate for 5 minutes.
For the Filling:
In the bowl of an electric mixer, beat the cream cheese on low speed for 1 minute until smooth and free of any lumps. Add the eggs, 1 at a time, and continue to beat slowly until combined. Gradually add sugar and beat until creamy, for 1 to 2 minutes.
Add sour cream, lemon zest, and vanilla. Periodically scrape down the sides of the bowl and the beaters. The batter should be well-mixed but not overbeaten. Pour the filling into the crust-lined pan and smooth the top with a spatula.
Set the cheesecake pan on a large piece of aluminum foil and fold up the sides around it. Place the cake pan in a large roasting pan. Pour boiling water into the roasting pan until the water is about halfway up the sides of the cheesecake pan; the foil will keep the water from seeping into the cheesecake. Bake for 1 hour to 1 hour 15 minutes. The cheesecake should still jiggle (it will firm up after chilling), so be careful not to overcook. Let cool in pan for 30 minutes. Chill in the refrigerator, loosely covered, for at least 4 hours. Loosen the cheesecake from the sides of the pan by running a thin metal spatula around the inside rim. Unmold and transfer to a cake plate. Slice the cheesecake with a thin, non-serrated knife that has been dipped in hot water. Wipe dry after each cut.
Easy Cheesecake (from Kraft!)
2 packages (8 oz each) cream cheese
½ cup sugar (can use more if you like it sweeter)
½ teaspoon vanilla
2 eggs
1 pre-made graham cracker piecrust
Preheat oven 325. Beat cream cheese, vanilla, and sugar until well blended. Add eggs and mix until blended. Pour batter into crust. Bake 40 minutes or until center is almost set. Cool. Refrigerate at least 3 hours.
Note: if making the cheesecakes in muffin pan use paper liners sprayed with cooking spray, a cookie for the crust and bake it for only 20 minutes!
Saturday, November 26, 2005
 Sugar Cookies and Good News!
First things first, Happy Thanksgiving!! I know, I am a little late, but still wanted to Thank You All for being part of my virtual and culinary world!
A friend invited us over for Thanksgiving and we had lots of fun, especially Matheus, who played the whole afternoon with the kids and had a very happy day! Since we went to Miriam’s house I did not have to cook much, so no new recipes these past days… to take to her house on Thursday I made Mashed Potatoes and a Barefoot Contessa recipe for Cranberry Fruit Conserve, which is very good and easy to make! (Recipe can be found here: http://www.foodnetwork.com/food/recipes/recipe/0,,FOOD_9936_24930,00.html) My friend made a nice turkey and other guests provided all the trimmings; very nice people, good food, it sure was fun!
Yesterday we did not have much to do; kind of a lazy day (I guess we were still a little stuffed from the day before!) and Matheus asked if we could bake cookies so he could decorate them. Since my definition of “fun things to do” usually involve the kitchen I was more than happy to make cookies with him!
I used a Sugar Cookie recipe that is extremely easy to do and that don’t need to be chilled before rolling, which is a big plus when making cookies with kids, as they don’t have that much patience to wait for dough to chill, cookies to cool, etc.
I have made this recipe numerous times before and it always come out perfect. It is a very basic recipe, but I do not remember where I got it from… oops! The dough is super easy to work with, it rolls smooth, the cookies are not too sweet and they get nice and crisp after they cool, which also makes them great to decorate!
We used some icing tubes I bought a while ago to decorate the cookies (easy for Matheus to play with and does not make a lot of mess), and some melted chocolate too!
Besides the cookies I have some good news… we are going to Brazil!! Yay!!
We were planning to go next year in January, but ended up deciding to go now and spend Christmas with the family. I can’t wait, I miss my family a lot! I will be going with Matheus on December 5, and the husband two weeks after that, and we will all come back home together in January.
The good thing is that in Sao Paulo (at my parent’s house) I will have access to the Internet so I will try to take some pictures and post them here to share a little bit of Brazil with you, so we all have something to look forward during my trip!
Well, that is it for today. I made a cheesecake yesterday and will post picture and recipe later today, plus there are a few recipes I am planning to make during this week, so come back to visit me!
Ana
Sugar Cookies
1 cup butter
1 cup sugar
1 egg
1 teaspoon vanilla
2 teaspoons baking powder
3 cups flour
Preheat oven to 400 degrees F. In a large bowl cream butter and sugar with electric mixer. Beat in egg and vanilla. Add baking powder and flour one cup at a time, mixing after each addition. The dough will be very stiff. Blend last flour in by hand. Do not chill dough. Divide dough into 2 balls, On a floured surface, roll each ball in a circle approximately 12" in diameter and 1/8" thick. Use cutters as guide; the dough should be only slightly thinner than cutter. Bake cookies on ungreased cookie sheet on top rack of oven for 6 to 7 minutes, or till cookies are lightly browned
Sunday, November 20, 2005
 Sunday Pasta!
As I have said here before, it is kind of a tradition in our family to eat pasta on Sundays. Now, let me tell you, I am not a big fan of pasta (Sunday is basically the only day of the week I eat it), but lately I have been inspired and trying to make pasta dishes other than the usual penne or spaghetti.
Today it was Lasagna! Very yummy!!
There is a recipe that I like which is very easy to make and yet very flavorful. I used whole-wheat lasagna noodles today and everybody agreed that they were delicious (including the Husband, which could not tell they were actually whole-wheat). I boiled the noodles first (for 8 minutes), and for the meat sauce I sautéed some onions and garlic before adding the ground beef and proceeding with the recipe.
The original recipe asks for 1/3 cup of cheese to top the lasagna, but I think that is way too little cheese, and in my world there is never enough cheese! So I don’t measure my cheese and just add enough to make it all cheesy and delicious! You can vary the recipe to your tastes, using ricotta instead of the cottage cheese, adding veggies to the red sauce, or even replacing the beef with ground turkey (which I have done before and actually prefer).
I like this recipe because although it is lasagna it is not too heavy. Plus, it is versatile, easy to make, and always pleases everybody!!
Enjoy!
Ana
Lazy Lasagna (Adapted from Cooking Light - Sepetember 1997)
1 pound ground beef
1 jar spaghetti sauce
1 (16-ounce) carton cottage cheese
3 tablespoons grated Parmesan cheese
Cooking spray
1 (8-ounce) package precooked lasagna noodles
Shredded mozzarella cheese
Preheat oven to 350°.
Cook meat in a large nonstick skillet over medium-high heat until browned, stirring to crumble. Add sauce; bring to a boil. Reduce heat, and simmer 5 minutes. Combine cottage and Parmesan cheeses in a bowl; set aside.
Spread 1/2 cup meat mixture in bottom of a 13 x 9-inch baking dish coated with cooking spray. Arrange 4 noodles over meat mixture; top with half of cottage cheese mixture, 1 cup meat mixture, and mozzarella cheese. Repeat layers, ending with noodles. Spread remaining meat mixture over noodles. Cover and bake at 350° for 30 minutes. Uncover; sprinkle with mozzarella cheese, and bake 5 more minutes or until cheese melts. Let stand 10 minutes before serving.
Friday, November 18, 2005
 Pretzels!
 The recipe I am posting today is from the October issue of Cooking Light (my favorite issue this year so far!). Matheus loves those soft and yummy pretzels they sell in the Mall, so when I saw the recipe in the magazine I knew we would try it!
This recipe for Pretzels is very easy to make, the only extra thing here (that some recipes does not ask for) is that you need to quickly cook boil the pretzel in a solution of water and baking soda before you bake them.
The first time we made it I followed the recipe exactly and got great results, the pretzels were very nice and had that distinctive pretzel flavor, which I actually associate to the crispy ones we but at the grocery stores (as opposed to the soft ones at the mall). The second time we made it I decided to bake 2 of the pretzels without the water bath… well, let me tell you, if you are going to make the pretzels go ahead and do the extra step, it is well worth it! The pretzels without the bath came out dry and without much flavor.
Next time I am going to try making some of them sweet, with cinnamon sugar on top instead of the salt. I wanted to do this but Matheus was in charge of sprinkling the salt on top and did not let me the try the sugar variantion.
Another thing, the recipe says 12 pretzels, but they are a lot smaller than the ones from the mall (about half of it I would say...).
Very easy and fun to make, Matheus loved making long snakes with the dough, definitely a nice project to do with kids!
Enjoy!
Soft Pretzels
1 package dry yeast (about 2 1/4 teaspoons)
1 1/2 teaspoons sugar
1 cup warm water (100° to 110°)
3 1/4 cups all-purpose flour, divided (about 14 1/2 ounces)
1 teaspoon salt
Cooking spray
6 cups water
2 tablespoons baking soda
1 teaspoon cornmeal
1 teaspoon water
1 large egg
2 teaspoons kosher salt
Dissolve yeast and sugar in warm water in a large bowl, and let stand for 5 minutes.
Lightly spoon flour into dry measuring cups; level with a knife. Add 3 cups flour and 1 teaspoon salt to yeast mixture; stir until a soft dough forms. Turn dough out onto a lightly floured surface; knead until smooth and elastic (about 8 minutes). Add enough of remaining flour, 1 tablespoon at a time, to prevent dough from sticking to hands (dough will feel slightly sticky).
Place dough in a large bowl coated with cooking spray, turning to coat top. Cover and let rise in a warm place (85°), free from drafts, 40 minutes or until doubled in size. (Gently press two fingers into dough. If indentation remains, the dough has risen enough.) Punch dough down; cover and let rest 5 minutes.
Preheat oven to 425°.
Divide dough into 12 equal portions. Working with one portion at a time (cover remaining dough to prevent drying), roll each portion into an 18-inch-long rope with tapered ends. Cross one end of rope over the other to form a circle, leaving about 4 inches at end of each rope. Twist the rope at the base of the circle. Fold the ends over the circle and into a traditional pretzel shape, pinching gently to seal. Place pretzels on a baking sheet lightly coated with cooking spray. Cover and let rise 10 minutes (pretzels will rise only slightly).
Combine 6 cups water and baking soda in a non-aluminum Dutch oven. Bring to a boil; reduce heat, and simmer. Gently lower 1 pretzel into simmering water mixture; cook 15 seconds. Turn pretzel with a slotted spatula; cook an additional 15 seconds. Transfer pretzel to a wire rack coated with cooking spray. Repeat procedure with remaining pretzels.
Place pretzels on a baking sheet sprinkled with cornmeal. Combine 1 teaspoon water and egg in a small bowl, stirring with a fork until smooth. Brush a thin layer of egg mixture over pretzels; sprinkle with kosher salt. Bake at 425° for 12 minutes or until pretzels are deep golden brown. Transfer to a wire rack to cool.
Yield: 12 servings
Cooking Light – October 2005
Wednesday, November 16, 2005
My new favorite Muffin
There she comes, with another muffin recipe… I know, I have posted quite a few muffin recipes, but I had to share this recipe here. And it is another recipe that comes from Nic’s blog, theBaking Sheet, called Whole Wheat, Oatmeal and Raisin Muffins. Healthy and yummy whole-wheat muffins made with one of my favorite ingredients of all: oatmeal! The muffins were surprisingly moist inside; the batter needs to sit for a while, so the oatmeal gets a chance to soak up some liquid, becoming pleasantly plump and chewy. Another addition I like is the wheat bran, which gives some sort of nutty flavor to the muffins. (I have a muffin recipe that I love which uses only wheat bran, the taste is amazing, and it is super healthy and full of fiber… but I will post some other time!)
We liked these muffins so much here that I have made it three times already in these past two weeks. I can’t get enough of them; I have been eating them for breakfast and sometimes for a late night snack, sooo good!
I make the batter the night before and let it sit on the fridge overnight, so we can have nice warm muffins out of the oven for breakfast. (It is so nice to smell muffins baking up in the morning!) All three times I made the muffins I used ½ cup of milk instead of the water, and omitted the dried fruits, as I am not a big fan of them (although Matheus loves raisins and asked me to put some in the muffins next time). Also, I used old-fashion rolled oats and did not chop them (I love the pieces of oatmeal in my muffins!), and I got 9 nice sized muffins out of the recipe. Give them a try; they are truly delicious!!
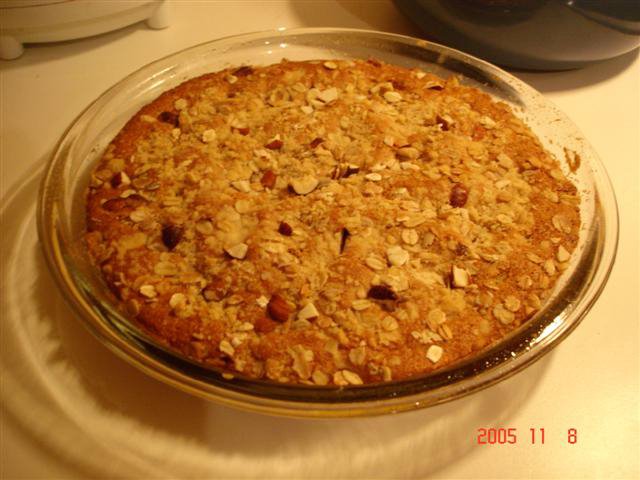
Keeping with the oatmeal theme, I am going to post a recipe I developed for Oatmeal Cake. When I was not feeling good with the nerve pain and all, and able to move a little more, I wanted to bake a cake, but also wanted something a little more nutritious since I was actually going to have cake for diner (you know, not feeling well… cake… comfort food… and to me oatmeal is the perfect comfort food!). I looked over some recipes and based on a CL light recipe for a crumb cake with apples I came out with my own version.
It makes such a small cake that I actually baked it in a 9-inch pie plate (as you can see in the picture above), and let me tell you, I made it for dinner and the cake did not last until next morning’s breakfast. We liked it a lot; it is a very light cake, perfect for an afternoon snack.
Maybe you will like one of these recipes too! And did I already tell you that I love oatmeal?
Enjoy!
Ana
Oatmeal Crumb Cake
1 cup flour
1/3 cup oatmeal
½ cup brown sugar
dash of salt (optional)
¼ cup butter, cut into small pieces
½ teaspoon baking powder
¼ teaspoon baking soda
½ teaspoon cinnamon
1/3 cup milk
1 egg yolk
2 egg whites, beaten into stiff peaks
Pre-heat oven to 350F.
In a bowl combine flour, oats, brown sugar, salt, and butter. Mix with the tips of your fingers until it resembles coarse meal. Reserve ½ cup of this mixture to be used later.
To the remaining mixture add the baking powder, baking soda, cinnamon, milk, and egg yolk. Mix until all ingredients are incorporated. Fold in the egg whites.
Pour batter into a greased pie plate (or a 8-inch cake pan). Sprinkle the reserved mixture on top. Bake in pre-heated oven for 20 minutes.
Note: I sprinkled some chopped walnuts before baking and that added a nice crunch to the cake.
Whole Wheat, Oatmeal and Raisin Muffins
1 cup whole wheat flour
1/4 cup wheat bran
1/4 cup sugar
1/4 cup brown sugar
1 1/2 tsp baking soda
1/2 tsp salt
1 tsp ground cinnamon
1 cup raisins (or other dried fruits)
1 1/2 cups rolled oats, slightly chopped (or quick cooking oats)
1 egg
1 cup buttermilk
1/4 cup vegetable oil
1 tsp vanilla
1/2 cup water
Preheat oven to 375F. Grease a muffin tin, or line with baking cups.
In a large bowl, whisk together flour, wheat bran, sugars, baking soda, salt and cinnamon. Stir in dried fruit and oats. In a small bowl, whisk together egg, buttermilk, vegetable oil, vanilla and water.
Add buttermilk mixture to oat mixture and stir until just combined. Let stand for 15-20 minutes. You may refrigerate the batter, covered, for about a week at this point.
Spoon batter into prepared tins by heaping 1/4 cups (about 1/3 cup).
Bake for 20 minutes, until muffins are golden brown and spring back when gently pressed. Add 5 minutes baking time if batter is cold.
Makes 12 large muffins
(Original Recipe from “Baking in America”)
Note: My muffins were ready after 20 minutes in the oven, and I used the batter straight from the refrigerator.
Tuesday, November 15, 2005
 I am back!
After a while without any postings I am finally back! Wow, I did not think I was going to miss posting here so much…
I had a hard time these past weeks with sciatic nerve pain. A few weeks going to doctors, lots of exams trying to figure out what was going on (you know, each doctor you see tells you it is something different… very frustrating), plus one week of basically not being able to do anything… sciatica is definitely not fun.
But, enough of that, I am feeling better now and back to my favorite “sport”: cooking! (The hardest part of having the pain and not being able to move was that I also could not cook…)
And before I post my recipes todayI want to thank everybody that wrote me, sent me e-mails and comments on my blog asking if everything was ok. I was very happy with all the messages and also to see that you are enjoying my blog as much as I am enjoying doing it, all that helped a lot in making me feel better! Thank you so much!
This past week I came back into action in my kitchen and have made quite a few new recipes!
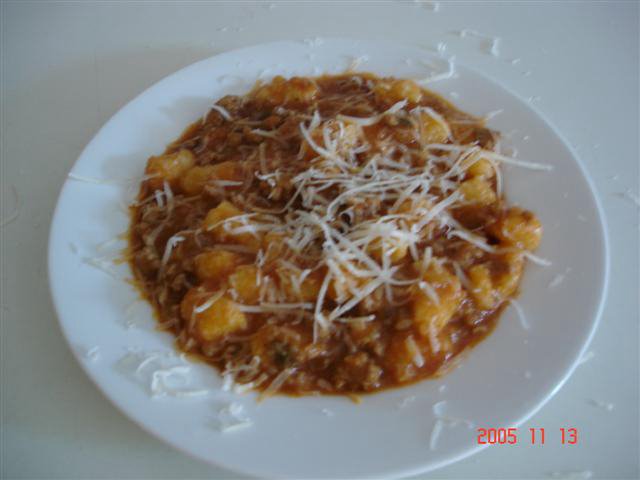
Over the weekend I made gnocchi, so good! I like everything made with potatoes, and gnocchi is definitely one of my favorite potato dishes! I actually made mine without a real recipe. My brother in law makes the best gnocchi, creamy, light, and fluffy, with a delicious rich homemade tomato and meat sauce. Last time we went to Brazil he made it for us and gave me directions on how to make it. So this past Sunday I decided to finally make the dish. Mine came out good, but Fabio’s Gnocchi still is the best!
Also over the weekend I was on a “chocolate thing” and tried two chocolate recipes. The first one I got from Nic’s post about lemon pudding cake on her blog, the Baking Sheet. She posted a new recipe for lemon pudding cake that looked delicious, but then I saw a link for a Chocolate Pudding Cake and, being the chocoholic that I am, after seeing the picture I just had to make it. It came out very good, with just enough pudding at the bottom to compliment the cake like a chocolate sauce would, and the cake part was delicious! The only thing I am thinking about making different next time is to use milk instead of the water that we pour over the cake. I thought that the pudding had some sort of “watery” flavor to it… maybe milk would make it richer.
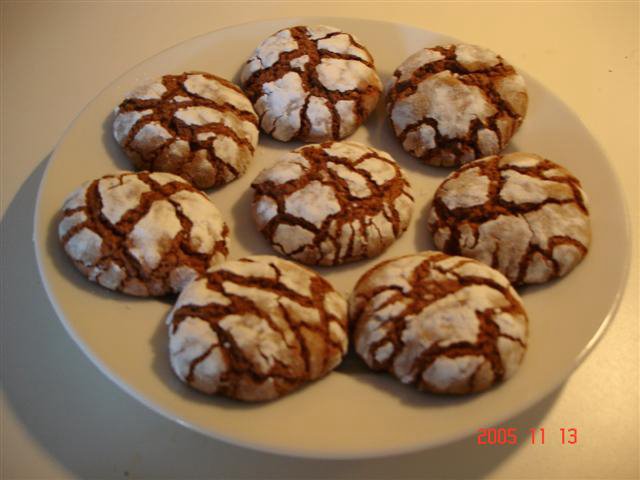
The other recipe I tried was for “Nutella Crinkle Cookies”. This one I got from www.recipegoldmine.com. I love nutella and have always thought this kind of cookies look so pretty, so I decided to try this version. The cookies were delicious and we loved them at home! I made half of the recipe and got 36 out of it, oh and I omitted the hazelnuts as I did not had them at home… left out from the cookie batter and rolled them only on powdered sugar. Very nice cookies, crunchy on the outside and chewy on the inside, with a nice “brownie-like” texture, very yummy! And they look great too, aren’t they pretty?!!?!?!
Ana
Nutella Crinkle Cookies
3 cups flour
2 teaspoons baking powder
1/2 teaspoon salt
1 (11 ounce) jar Nutella
1/4 cup shortening
1 1/3 cups granulated sugar
2 eggs
1 teaspoon vanilla extract
1/3 cup milk
1/2 cup chopped, toasted hazelnuts
2 cups finely chopped hazelnuts
Sifted confectioners' sugar
Preheat the oven to 375 degrees F.
Stir together flour, baking powder and salt in a medium mixing bowl.
Beat Nutella and shortening in a large bowl until combined. Add sugar and mix until combined, beat in eggs and vanilla. Add flour and milk alternately and mix until just combined. Stir in the 1/2 cup toasted hazelnuts.
Cover and chill several hours until firm. Shape dough into walnut-sized balls. Roll in finely chopped hazelnuts, then in confectioners' sugar. Place on greased cookie sheet and bake for 8-10 minutes - surface should be cracked and cookies set.
Makes about 70.

Nic’s Chocolate Pudding Cake
3/4 cup ap flour
2/3 cup sugar
1/2 cup cocoa powder, divided
1 1/2 tsp baking powder
1/2 tsp salt
1/2 cup milk
3 tbsp vegetable oil
2/3 cup brown sugar
1/4 cup chocolate chips (miniature, if you have them)
1 tsp vanilla extract
1 1/4 cups hot water
Preheat oven to 350F.
Combine flour, sugar, 1/4 cup cocoa, baking powder and salt in an 8 inch square baking pan and stir with a fork to combine. Mix in milk and oil until batter is uniform.
Sprinkle brown sugar, 1/4 cup cocoa and chocolate chips evenly over batter. Add vanilla to the hot water and pour over everything. Do not mix.
Place pan in oven and bake for 30-35 minutes, until surface of the cake looks dry. The pudding will be bubbling around the edges. Allow to cool for a few minutes before serving. Leftovers, if you have them, may be stored for one day at room temperature. Reheat before serving. Serves 8-9
Thursday, October 20, 2005
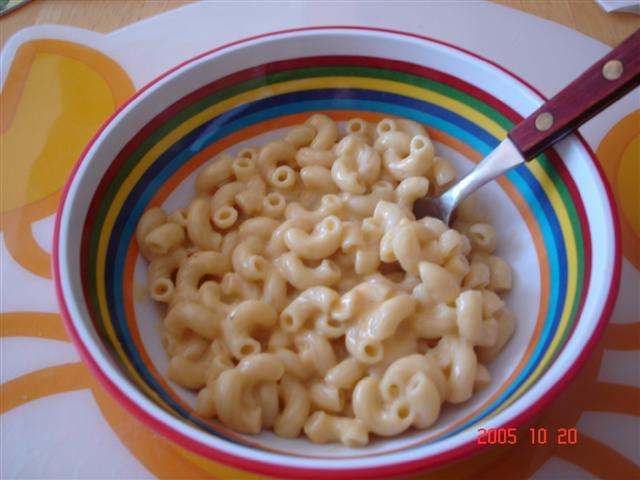 Macaroni and Cheese
With so much tasting and testing involving ice cream lately, plus the weather that does not decide if it really is going to be fall or not (it was 85 degrees F yesterday), both Matheus and I developed some sore throat… oh well, it was for a good cause!
We had strawberry-banana shake for breakfast, as Matheus did not want to eat anything, so in order to get him to eat something for lunch I decided to make one of his favorites: Macaroni and Cheese.
Pure American food, every kid likes macaroni and cheese here! I had never eaten or heard of it until I came to the US; pasta at my house was usually spaghetti with mom’s tomato sauce on Sundays!
I kind of created my own recipe today, did not measure or anything, and you know what, it was one of the best macaroni and cheese I had! Not many ingredients, very easy to make and Matheus liked it too! I am not the biggest fan of this dish, I much prefer an Alfredo sauce, but this one came out nice, and much better than the boxed stuff (which I don’t like at all).
I cooked the macaroni, drained and reserved. Added a tablespoon of butter to the pan (the same one I used to cook the pasta), and then evaporated milk (about a 1 cup) with some flour dissolved in it (2 teaspoons maybe). Let it sort of cook and thicken a little over medium heat, season with a little bit dry mustard, salt and pepper to taste, then added shredded cheddar cheese until it reached a creamy and cheese consistency. Added back the cooked pasta and stirred.
Easy and simple! Not fancy at all, but definitely comfort food!
Enjoy!
Wednesday, October 19, 2005
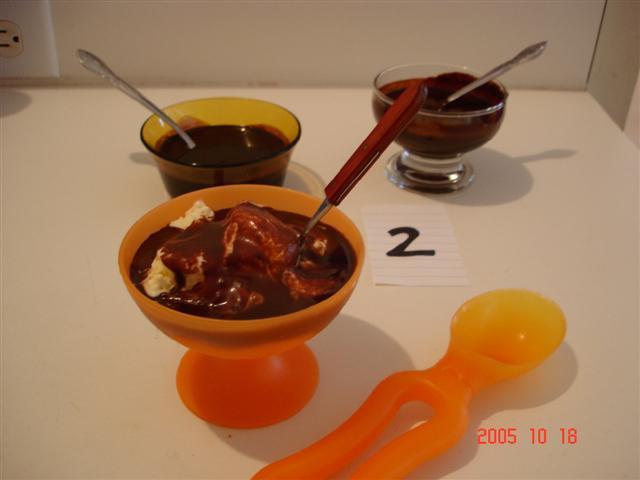 The chocolate sauce experiment…
I don’t know why, but I really got a craving for chocolate sauce this week! Yesterday I decided to try two more recipes in my quest to find the best chocolate sauce. I did some research over different recipes, some had corn syrup (which I don’t like but though would be some sort of key ingredient), others did not have it but had heavy cream instead, and that actually was the key here! It was so obvious and I don’t know why I did not think of it before, the best chocolate sauce had to have some sort of ganache-quality to it!
One of the sauces I tried yesterday had corn syrup in it, and it was definitely not my favorite at all. The other one was almost a ganache sauce, with more liquid than chocolate in it, and this was “the chocolate sauce” I was looking for. I made up the sauce (after reading lots of other recipes), it is super simple and have just a few ingredients, which I measured and took note as I cooked so I could share here with you. I found a great recipe yesterday, and the one I first tried over the weekend ended up not being so bad at all.
I am going to post here the two recipes we liked the most, one is a little “lighter”, and the other one is “super good”! And when it comes to having ice cream, the “super good” category definitely comes first to me!
Enjoy!
Ana
My Chocolate Sauce!
¼ cup milk
¼ cup heavy cream
1 tablespoon butter
1 ½ tablespoons sugar
3 oz semisweet chocolate chips (or chopped chocolate)
Simmer milk, cream, sugar, and butter over medium heat, just to warm them up and get the sugar dissolved. Add chocolate and whisk until smooth. Simmer over medium heat for 1 or 2 more minutes, until it thickens slightly.
Rich Chocolate Sauce![]() 1/2 cup sugar
1/2 cup sugar
1/2 cup unsweetened cocoa
1 cup fat-free milk
1 tablespoon butter
1 1/2 ounces semisweet chocolate, chopped
1/2 teaspoon vanilla extract
Combine sugar and cocoa in a small saucepan; stir in milk and butter. Bring to a boil over medium heat, stirring constantly. Cook 3 minutes, stirring constantly. Remove from heat; stir in chocolate and vanilla, stirring until chocolate melts. Serve warm or let stand 10 minutes to thicken. Yield: 1 1/2 cups.
Cooking Light, January 2002.
Sunday, October 16, 2005
 Oatmeal… Yumy!
After a few days without posting I am back to talk about something I love and that instantly brings me comfort just to think about it: oatmeal!
I love oatmeal in everything from cakes, to cookies and muffins too, but the way I like to eat oatmeal the most is in its simplest form, cooked with milk and sugar. My mom used to make this for us all the time for breakfast, especially during the cold months. Sometimes she would also make these bowls of warm oatmeal for us to eat before bedtime. In Brazil it is not usual to have heating systems in the houses, so the oatmeal was more than welcome during the winter, warming up our bodies and soul before we went to bed.
When I had Matheus my mom and my sister came to stay with us and help during the first month (and what a big help that was!), and she made oatmeal for me every night. I would nurse Matheus and come to the kitchen to have some warm and deliciously sweet oatmeal with my mom and my sister, and it was so comfortingly good, sweet and creamy and best of all: made by my mommy! And you know how good it is to have someone special with you when you are going through such adaptation period.
After she went back I still would make my oatmeal every night before going to bed for a few hours of sleep, sometimes I would sit down and enjoy it warm, sometimes the plan didn’t work well as Matheus would wake up just as I sat down to eat, or even when I was in the middle of the cooking/stirring process… so some nights I would end up with cold oatmeal, or no oatmeal at all, but it was worth not to eat it and go comfort my baby boy, as now I have my own company to eat oatmeal with! (Hubby is not a fan of the sutff…) Matheus also loves oatmeal and to sit and enjoy it with me, and this to me is the best thing in the world! Even more because he says my oatmeal is “the best ever”!
Among doctor’s appointments, school projects, swimming lessons, and a lot more, I managed to find some time and made some oatmeal for us on Friday night. Yes, Matheus and I had oatmeal for dinner, and it was the best dinner of the week I might add!
This thyroid hormone thing is still not quite right, so my body is on an adjustment craziness that sometimes get me down a bit, and nothing better than some yummy comfort food to help us feel good again.
I was in need of some pick me up on Friday, so I decided to make oatmeal for dinner and Matheus loved the idea as much as I did. We were talking about it when he suggested we put some fruit in our oatmeal, so I remembered a recipe I saw on CL a few months ago for Oatmeal with Apples, Hazelnuts, and Flaxseeds. I tried to make it as written, and almost succeeded, the only except was that I burnt the hazelnuts… the good thing is that I did not miss them at all!
My mom always cook oatmeal with milk and sugar, and that is what I did with mine (I could not help myself, it was weird to have a "recipe for oatmeal". I always make it my moms way, this time I tried my best to stick to the recipe tough). I made ½ recipe and used more milk than the recipe says (2 cups for ½ recipe), added the sugar during the cooking process (instead of sprinkling on top), I added it to taste, did not measure it at all, and I slightly toasted the almonds we sprinkled on top, just to give them a crunch and bring out their nice flavor. I always make my oatmeal just my mom’s do, cooking it over medium heat, stirring it all the time (so it won’t stick to the bottom of the pan), until thick and creamy. It is soooo good, I LOVE oatmeal!
I liked the apple version; the apples came out nice and soft. I did not use granny smith though, as I like my cooked apples more on the sweet side. As you see I kind of ended up making my moms oatmeal with a few new twists, and I will post here the CL recipe in case you want to try!
(The proportions I always make is 1 cup of milk for 3 heaping tablespoons of oatmeal, sugar to taste)
Today I wanted ice cream with chocolate sauce… we bought the ice cream and I decided to adventure myself with the sauce. It came out good but not exactly as I wanted, not fudgy enough, so I will not post the first recipe I tested. Instead, I am going to experiment during the week and when I find out the right recipe I will share here with you all!
Until then, let me ask you guys, do you have a recipe for some fudgy chocolate sauce? The recipe I tested used cocoa, sugar, milk, butter, and semisweet chocolate chips. It came out nice looking and good tasting too, but still not as I wanted. I am guessing I need some corn syrup to make it sort of fudge-like, right?! (Not a big fan of corn syrup though…)
Just one more thing, off topic and nothing to do with food, but… does your husband (significant other) also doesn’t notice when you get a hair cut or is it just mine?!!?!?!?!?!?!?!
(Yes, oatmeal is comforting and makes you very happy when you get abrand new hair cut!)
Ana
Ice cream and chocolate sauce

Oatmeal with Apples, Hazelnuts, and Flaxseed
1/4 cup hazelnuts
3 cups fat-free milk
1 1/2 cups regular oats
1 1/2 cups diced Granny Smith apple (about 1 medium)
1/3 cup ground flaxseed
1/2 teaspoon ground cinnamon
1/4 teaspoon salt
1/2 teaspoon vanilla extract
3 tablespoons brown sugar
3 tablespoons slivered almonds
Preheat oven to 350°.
Place hazelnuts on a baking sheet. Bake at 350° for 15 minutes, stirring once. Turn nuts out onto a towel. Roll up towel; rub off skins. Finely chop nuts, and set aside.
Combine milk and next 5 ingredients (through salt) in a medium saucepan. Bring to a boil over medium heat. Stir in vanilla. Cover, reduce heat, and simmer 5 minutes or until thick. Sprinkle with hazelnuts, brown sugar, and almonds.
Cooking Light – May 2005
Wednesday, October 12, 2005
 Rainy days…
It has been wet and rainy, cloudy for the past 5 or 6 days and I think if it keeps raining like this I am going to start growing mold… I don’t like cold weather, even more when it rains all the time. I want sunshine, please!
As boring as they are, these cold days inspire me to make soup, and soup is always a good thing! Not much cooking yesterday, but Monday I made a soup I like a lot, Acorn Squash and Apple Soup. I got the recipe from a website called justvegetable recipes, but I changed it so much that I don’t even look at the recipe anymore when I am making it. Soup is something that I kind of get inspired to make and eat, and most of the time I just throw whatever I am in the mood for (or have in the fridge) in the pot, some broth and seasonings and there is my soup! There are some soups that I try recipes and others that I look at the recipe and kind of make it my way, which is the case with this one.
I had an acorn squash and some apples from the farmers market, so decided to make this soup once again (I have made this a zillion times, it is one of my favorite soups!). I have also made this one using butternut squash and it is even better than with acorn.
I took a picture of the squash and believe it or not, forgot to take a picture of the final soup… oops! Well, just imagine a thick and orange – yellowish soup, ultra creamy and flavorful, yummy; I guess you’ve got the idea!
I am posting below the way I make the soup, but you can vary it to suit your tastes. You can use different varieties of winter squashes, omit the apple, and add ginger or other spices you might like. It can even be served with a dollop of yogurt on top. I like mine just as is, pure and simple, creamy and velvety smooth!
Besides the soup, I baked an apple cake to use the peels from all the apples I used in the apple pie. The apples are great, but the peels are full of vitamins and fibers, and I did not want to waste it. So I put them in a pan, covered with apple cider and cooked over low heat until the cider evaporated, then processed them in the blender and made a very tasty applesauce, which I used in the cake together with one diced apple. I am going to post the original recipe for the cake below, as it is super simple, and great for the cold months. And besides using the applesauce (for the peels called in the recipe), I used 1 cup of all-purpose and 1 cup of whole-wheat flour, and only 1 cup of sugar (as my applesauce was already sweet due to the apple cider reduction). As you will see I baked mine in muffin tins, so I could easily freeze the leftovers for breakfast.
Very easy to make and tasty too! This recipe I got from a Brazilian site called www.cybercook.com.br, a friend named Clemente posted it in the bulletin boards.
Enjoy!

Acorn Squash and Apple Soup
1 cooked acorn squash
1 ½ cups chicken broth (may need less or more, depending on how thick you like your soup)
1 diced apple, peeled
¼ cup chopped onions
½ cup apple juice (or cider)
Salt and pepper to taste
Combine the apple, onion and ½ cup of broth in a pan, cook over low heat until the apple is soft, about 8 minutes or so. Add cooked squash, apple juice, and remaining chicken broth, until you reach desired consistency. Season to taste and cook covered until flavors have blended and ingredients are tender, about10 minutes more (you may add more broth if needed). Puree soup in blender in batches, return to the pot, add a tablespoon of butter (if desired) and reheat gently.
Notes: To cook the squash you can boil it, bake it (halved, seeded, cut side down in a baking sheet), or microwave it. I learned how to cook it easily in the microwave and have been doing this way ever since: “stab” the whole squash with a knife (just as we do with a fork to baking potato), do it slowly and carefully and make sure to go all the way through the cavity, microwave it for 10 to 20 minutes, until soft and squishy (depends on size of squash). I microwave it whole, then it is easy to cut and remove the seeds, just wait for the squash to cool down a bit, and be careful because it is hot inside. Remove seeds and scoop out the pulp to use in the soup!

Apple and Cinnamon Cake
2 cups all-purpose flour
2 cups sugar
½ cup canola oil
3 apples, cored, peeled, and diced – reserve the peels
3 eggs
1-tablespoon ground cinnamon
1-tablespoon baking powder
Preheat oven to 350F.
In a bowl combine flour, baking powder, cinnamon and the diced apples, set aside.
Puree in the blender the apple peels, eggs, oil, and sugar. Add mixture to dry ingredients and mix until combined well. Pour batter into a greased and floured pan and bake in pre-heated oven for 35 minutes, or until toothpick inserted in the center comes out clean.
Monday, October 10, 2005
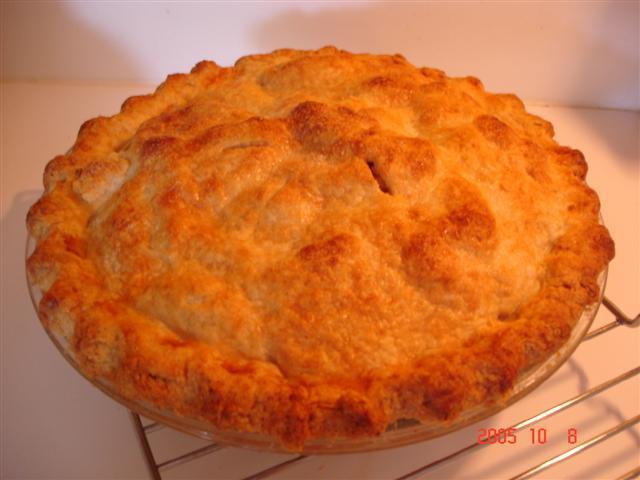 Apple Pie!
If someday I had to choose a pie it would definitely be apple! I like apples a lot, and during the cold months my favorite way to eat them is either cooked or baked. I love apple crisps (peach and blueberries too!) and cobblers, they are easy to make, warm and comfortingly good!
Since I have had a few disasters with pastry dough I settled myself into making crisps when I wanted some warm desert, and I actually prefer crisps to pie.
However, as challenging as it is, I wanted to make an apple pie this fall. So I went to the farmers market (one of my favorite places) last week to see what I could get and was faced with tons of apples, different varieties, from the tart to the most sweet ones. Needles to say I came back home with a full bag of yummy crispy apples, and some delicious apple cider too!
For eating raw I like the Fuji ones, they are crispy and crunchy, tart and sweet, kind of “cider-like” in taste, but for pies I wanted to have a mix of them, so I filled my bag with a couple of each of the ones that were said to be good in pies and hold their shapes, and there were so many varieties that I don’t even remember which ones I got!
I chose a recipe that was posted on the CL bulletin board, however the recipe comes from Cook’s Illustrated. It is called Classic Apple Pie, and is actually not that difficult to make at all. I took my time and got all the right ingredients, made the dough and let it rest in the fridge overnight, Saturday morning I assembled the pie and baked, everything just as the recipe said. And the recipe is good, because I did not have one little bit of problem with the dough, and the pie came out great!
The only thing I did different was to omit the lemon zest (thought it would be too strong), the allspice (did not have), and the nutmeg (not a big fan of it in sweets). Also, I added a tablespoon of flour to the filling (because I was afraid the apples would give out their juices and make the pie wet), and brushed the top with milk instead of egg white. For everything else I followed the recipe and will do the same when I make it again, which is very likely so.
The crust was flaky and crispy and soft, and the apples came out nice, not mushy at all, just perfectly cooked, sweet and “cinnamonwy”! A good pie and I was very proud of myself because this was definitely my best pie of all!
Now I am going ask here a question for those who like to make and eat pies: I used vegetable shortening in the dough, but I am not a big fan of it myself (and now I am stuck with a whole can of the stuff leftover in the pantry). I saw recipes for pie dough that only used butter, but since most of them ask for a combination of butter and shortening I decided to try it this time. My question is: how is pie dough made only with butter? I know that the shortening makes it flaky, but how is it taste wise?
To be true… I don’t really care for the dough, what I like in the pie is the filling, so flakiness is not a big deal with me. I know taste is something very particular to each one of us, and that the best way to see the difference will be trying it myself, but I wanted to ask and see the different opinions in the subject, you know, it is nice to be able to talk to more people and get real reviews about foods you like.
Thanks for visiting and I hope you try the pie too!
Ana
Classic Apple Pie (Cook's Illustrated)
Serves 8
Pie Dough
2 1/2 cups unbleached all-purpose flour , plus extra for dusting
1 teaspoon table salt
2 tablespoons granulated sugar
12 tablespoons unsalted butter chilled, cut into 1/4-inch pieces
8 tablespoons vegetable shortening (chilled)
6 - 8 tablespoons water (iced)
Apple Filling
2 (cookbook says 1 1/2 pounds) pounds Granny Smith apples (4 medium)
2 pounds McIntosh apples (4 medium)
3/4 cup granulated sugar
1 tablespoon granulated sugar
1 1/2 tablespoons lemon juice
1 teaspoon lemon zest from 1 medium lemon
1/4 teaspoon table salt
1/4 teaspoon of freshly ground nutmeg
1/4 teaspoon ground cinnamon
1/8 teaspoon ground allspice
1 egg white , beaten lightly
1. Pulse flour, salt, and sugar in a food processor workbowl fitted with the steel blade. Add butter and pulse to mix in five 1-second bursts. Add shortening and continue pulsing until flour is pale yellow and resembles coarse cornmeal, four or five more 1-second pulses. Turn mixture into medium bowl. (To do this by hand, freeze the butter and shortening, grate it into the flour using the large holes of a box grater, and rub the flour-coated pieces between your fingers for a minute until the flour turns pale yellow and coarse.)
2. Sprinkle 6 tablespoons ice water over mixture. Press mixture together with broad side of rubber spatula, adding up to 2 tablespoons more ice water if dough will not hold together. Squeeze dough gently until cohesive and divide into two equal balls. Flatten each into a 4-inch-wide disk. Dust lightly with flour, wrap separately in plastic, and refrigerate at least 30 minutes, or up to 2 days, before rolling.
3. Remove dough from refrigerator. If stiff and very cold, let stand until dough is cool but malleable. Adjust oven rack to center position and heat oven to 425 degrees.
4. Roll one dough disk on a lightly floured surface into a 12-inch circle. Fold dough in quarters, then place dough point in center of 9-inch Pyrex regular or deep dish pie pan. Unfold dough.
5. Gently press dough into sides of pan leaving portion that overhangs lip of pie plate in place. Refrigerate while preparing fruit.
6. Peel, core, and cut apples into 1/2-to-3/4-inch slices and toss with 3/4 cup sugar and lemon juice and zest through allspice. Turn fruit mixture, including juices, into chilled pie shell and mound slightly in center. Roll out other dough round and place over filling. Trim top and bottom edges to 1/2 inch beyond pan lip. Tuck this rim of dough underneath itself so that folded edge is flush with pan lip. Flute edging or press with fork tines to seal. Cut four slits at right angles on dough top. Brush egg white onto top of crust and sprinkle evenly with remaining 1 tablespoon sugar.
7. Bake until top crust is golden, about 25 minutes. Reduce oven temperature to 375 degrees; continue baking until juices bubble and crust is deep golden brown, 30 to 35 minutes longer. Transfer pie to wire rack; cool to almost room temperature, at least 4 hours.
Saturday, October 08, 2005
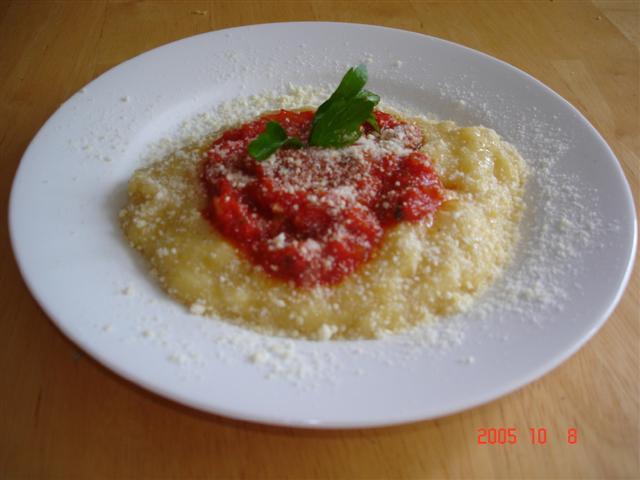 I want my mommy!
My grandmother used to make it for the whole family, a big nice pot of creamy polenta in the center of the table and everybody gathered around. Next to it a pan with the best chicken stew, full of flavor, perfectly seasoned, made with a free-range bird that probably came from one of the neighbor’s chicken collection. Oh my, talk about tasty! My mom then would make the same dish at our home, and hers was just as good, the polenta so creamy and delicious and the chicken also divine!
And I don’t know what they both have been hiding from me, but I still cannot get the same flavors when I try to make the chicken myself. It still comes out very good, but there must be something I am missing because the sauce does not come out quite the same, or maybe the fact that someone else made it for you makes it even better and more special, yes, I guess that is it!
I was craving polenta with chicken, but what I really wanted was to ask my mom to make it for me… if only I could go to one place today, that would definitely be my mother’s kitchen, and there I would be mom, and my dad, and my sister, all waiting for me to eat polenta together!
Well, unfortunately all this would not be possible, so I made some polenta for us today, and boy it was good!! It did satisfy my cravings, bringing me back some wonderful memories like no other food could ever do.
I ended up not making the chicken, but made some fresh tomato sauce to go with the polenta, using a bunch of tomatoes that we got from the garden this past week (probably the last bunch, and I was actually surprised to see such bounty this time of the year), and we had it all with roasted chicken. Not quite my ideal for a polenta meal (I missed the stewed chicken), but still it was good, and the polenta came out just as I wanted it to.
I did not use a recipe for the tomato sauce; I sautéed some onions and garlic in olive oil, pureed in the blender a bunch of tomatoes and added them to the pan. Seasoned with salt and pepper and simmered until the flavors were concentrated and the sauce reduced down. At the end I added some fresh chopped parsley, just to brighten up the flavor.
The polenta however I always make the way my mom taught me to! It is the easiest and simplest thing, but you need to have a pressure cooker… that is the only way I make polenta, and here it is how it works: the ratio is for every cup of cornmeal you will need 4 cups of water. (polenta can be made in a normal pot, but you need to stir constantly and as it boils it also splaters all around the stove and makes a huge mess...!)
My mom's Polenta: In the pressure cooker bring to a boil 2 cups of water with 1-tablespoon butter and 1 cube of bouillon (vegetable, chicken, beef, whatever you prefer). In a bowl combine 2 cups of water and 1 cup of cornmeal, whisk together until the cornmeal dissolves. Slowly add the cornmeal mixture to the boiling water in the pan, mixing constantly with a wooden spoon so it won’t lump up. Close the pressure cooker and cook it for 30 minutes at medium heat (start counting the time as soon as the cooker gets pressure – making that “tchu tchu” noise). You can double the recipe, and in that case my mom says you should cook it for 40 minutes. Easy, simple and delicious!
Some people add butter and grated cheese to the hot polenta. However, my mom used to make it the simplest way and that is how I like to eat, but definitely feel free to improve the flavors of the polenta yourself, as butter and cheese makes everything even tastier and creamier.
That is it for today, but come back to visit because I have a nice new recipe to share. It is still cooling in the counter so I will post the recipe and picture tomorrow. Until then I will give you a sneak peak… can you guess what it is?

Thursday, October 06, 2005
 D is for…
 Doughnut… Cookies that is! Today was Matheu’s show and tell and the letter of the week was D, so we made some “Doughnut Cookies”. When I started with our “letter-baking project” I already know I would be trying this cookies for letter d week. I saw them at Joe’s blog, Culinary in the Desert, and since then was just waiting for an excuse to bake them and have some fun in the kitchen. And fun we had yesterday! The cookies were super simple to make and the dough very easy to work with, plus Matheus had a blast with the decorations; our kitchen was happy and colorful, not to mention full of sprinkles!
I made the dough Tuesday and let it rest in the fridge overnight, baked the cookies yesterday morning and then Matheus and I decorated then in the afternoon. A fun project that was a hit with the kids at preschool!
The cookies are simple and not too sweet (which I like), so the glaze complements them well. Matheus loved his doughnuts and so did daddy, I was glad the recipe yielded a lot (48 cookies). And I could not believe when my “gourmet hubby” said he liked the doughnut cookies better than the macaroons…(can you tell he is definitely NOT a foodie?!?!?!)
A fun day in the kitchen, besides I am very pleased with having accomplished two successful cookie recipes in a row!
Thanks Joe for sharing your recipe for the doughnut cookies!
Now I am trying to find something with E that the kids will like… I can’t think of anything else besides eggplant, endives, and escarole… all of which I don’t think would make for a good snack… and Matheus suggested eggs!
Doughnut Cookie's (adapted from King Arthur Cookie Companion)
Dough
2 tbls canola oil
3 tablespoons unsalted butter, melted
2 large eggs - room temperature
2 tsp vanilla extract
3/4 tsp salt
2 tsp baking powder
4 oz confectioners' sugar (1 cup)
10 1/2 oz all-purpose flour (2 1/2 cups)
Icing
4 oz confectioners' sugar (1 cup)
4 tsp milk
4 tsp light corn syrup
Your choice of food coloring
Directions - Dough
Beat oil, butter, eggs, vanilla, salt, baking powder, and sugar until smooth in a medium bowl. Add flour, beating until smooth. Cover bowl with plastic wrap and place in the refrigerator to chill for at least one hour.
Preheat oven to 350. Line two baking sheets with parchment paper.
Scoop the dough into 2 teaspoon sized balls. Roll the balls into ropes about 4 inches long and about 1/2 in diameter. Coil the ropes into round doughnut shapes, leaving a small hole in the middle.
Place the cookies on the baking sheets about 1 inch apart. Place in the oven and bake for about 18 minutes. They will have just a slight golden color on top - but will not be brown. Remove from the oven and transfer to a rack and cool completely before icing.
Directions - Icing
Place 1/4 cup confectioners' sugar into 4 tiny bowls. Add 1 tsp milk and 1 tsp corn syrup to each bowl. Stir until you have made a spreadable icing - add milk drop by drop until you reach the desired consistency. Tint the icing in each bowl a different color.
Dip the top of each cookie in one of the icings and place back on rack to let the frosting harden completely.
Yield: 42 cookies
(Check out Joe's post and pictures here: http://desertculinary.blogspot.com/2005_09_01_desertculinary_archive.html)
Tuesday, October 04, 2005
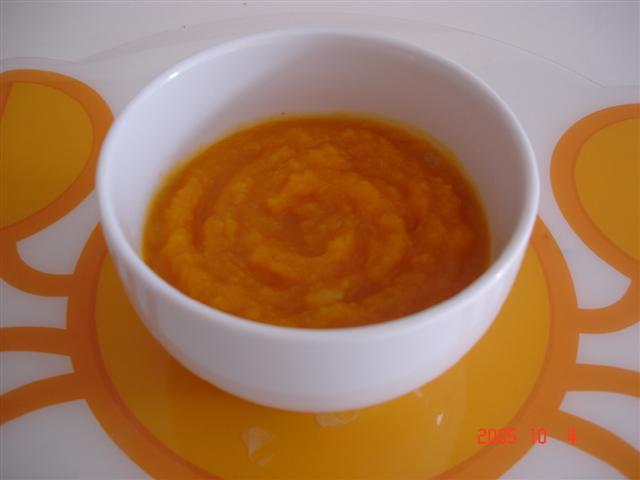
 “Squashy” day!
At $0.38 a pound I could not contain myself today when saw such squash sale at the grocery store, and so I bought home a spaghetti, an acorn, and a butternut squash! Yum! However, it wasn’t so difficult to decide which one to make first, as I was craving the flavors of butternut, my favorite squash of all! I like pumpkins and all of the others, but no winter squash is as creamy and delicious as the butternut. It has a firm and bright orange flesh, which turns into perfection once roasted or cooked. Hence its name, it is really buttery and creamy, deliciously loaded with vitamins, healthy and good for you!
So today I made roasted butternut squash. I was thinking about making soup but the squash was so delicious that we ended up eating it just pureed, oh my, talk about creaminess!
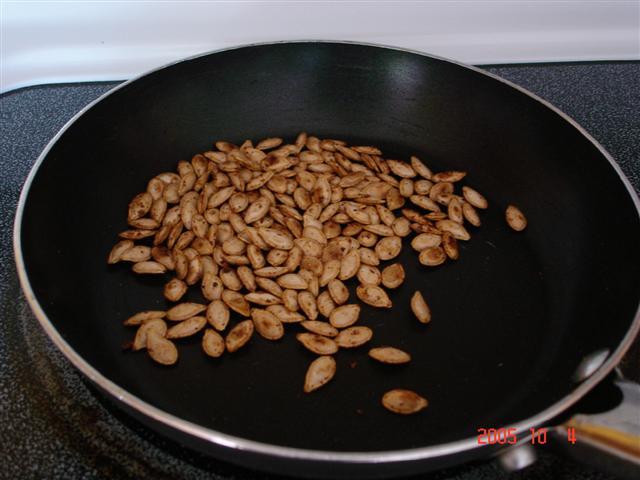
Whenever I think about pumpkin I remember my grandmother and when she used to make her “pumpkin compotes” (Doce de Abobora). She would clean up big pumpkins and chunk them, then cook the squash in a large iron pot with cinnamon, cloves, and enough sugar to make it a delectable sweet concoction. The compote itself was really sweet, but every single one in the family simply loved that one, even the non-pumpkin eaters. And for me besides the compote there was also the pumpkin seeds, which she would roast in a skillet, sprinkle some salt and call it a snack. What a nice and crunchy snack it was! I loved the pumpkin compote and those little seeds even more, plus it was fun to watch her shake the skillet swirling all the seeds around, and as they got toasted they would start to pop, cracking and bursting out of the pan, nutrition and entertainment at the same time!
I remember all this from my early years and to this day there is no way I will open a pumpkin (and any sort of squash for that matter) and not separate the seeds for a toasty snack. And I guess some of our tastes may pass to our kids through our genes, because every single time I make pumpkin/squash the first thing Matheus asks is “mommy, did you make those pumpkin seeds?” Once he tried the seed he also fell in love with it. Today I toasted the butternut seeds and I actually like them better than the pumpkin ones, they are smaller and get even crunchier! I toast them in the skillet, as my grandmother did, with a little bit of olive oil and salt to taste; I also add a little bit ground pepper, garlic salt and paprika, so they get spicy and flavorful. As I was toasting the seeds today it came to me that you might even be able to make them sweet, by adding sugar and cinnamon to it. However, I had so much sugar yesterday that the salty ones were perfect for today!
And as I said it was a “squashy” day, because besides the butternut I woke up early and used some leftover pumpkin to bake pumpkin muffins for breakfast this morning. I have seen lots of pumpkin recipes lately and ended up creating my own. It came out so good that I could not even believe it I made them myself! The muffins rose nicely, were moist and tender, with a hint of cinnamon and a not at all overpowering pumpkin flavor, just sweet enough for a warm breakfast treat. Very good, and I liked it a lot!
I will post the recipe here, it was so easy and simple to make that you may also enjoy it yourself. Today I only added cinnamon, but believe that ground cloves would do wonders to the pumpkin flavors on this one (pumpkin pie spice might work even better). I definitely need to buy some ground cloves on my next stop at the grocery store.
Well, that is it for today, happy pumpkin eating for you all too!
Ana
Toasted seeds
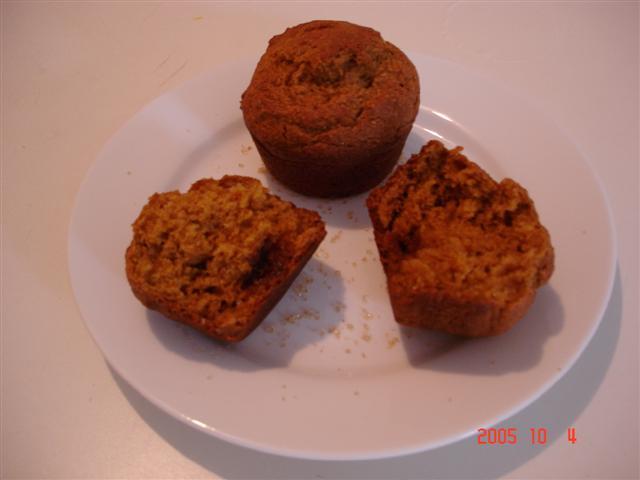
Pumpkin Muffins
3/4 cup all-purpose flour
3/4 cup whole wheat flour
1 cup pumpkin puree
3/4 cup brown sugar, packed
1 1/4 teaspoons baking soda
1 teaspoon ground cinnamon
1/4 cup skim milk
1/4 cup plain nonfat yogurt
1 large egg
1 tablespoon canola oil
dash salt, optional
Subscribe to:
Posts (Atom)
