Showing posts with label Cheese. Show all posts

Sunday, October 31, 2010

Happy Halloween!!!

Would you like some "worm pasta" for lunch today?

Or perhaps you would prefer to snack on some monster mouths??

Not that we like gross foods, but we do like to have some fun in the kitchen, and today we did have monster mouths for breakfast and worm pasta for lunch. And as weird (or gross) they may sound, they were delicious!
For the mouths it is as simple as can get, apple slices + almond butter (or pb) + mini marshmallows, quite a fun and delicious bite! (and with the exception of the marshmallows in there, also quite a nutritious snack. Nut butter + apples make a balanced snack with protein, fats and good carbs, plus all the goodness apples/fruits has to offer).
The pasta was homemade bucatini, the spaghetti-like one that has a whole in the middle and looks like a straw, and it was freshly made by the husband. It was fun making the pasta, and eating it too!
We added a bit of pumpkin puree to the pasta dough and it made the pasta incredibly delicious. You can actually taste the pumpkin, but it makes the dough soft and with a wonderful texture.
Then, being Halloween along with my obsession with pumpkin lately, we had to have a pumpkin sauce!
I made mine inspired on HEAB's pumpkin goat cheese sauce, and it turned out into a delicious Creamy Pumpkin and Goat Cheese Pasta Sauce!! I didn't follow the recipe posted by Heather, basically just got the idea from the combo of pumpkin and goat cheese, so I am posting here the way I did.
It could not be more simple or easy to make, and it was so good, I scraped every single bit of the sauce with a spatula before washing that pan. Oh, and adding a shaving of Parmesan cheese on top made this even better.
Hope you all have a great and safe Halloween! Matheus is beyond excited and can barely wait to go out tonight. At least now he has a belly full of nutritious food so a bite or two of candy won't hurt.
Happy trick or treating!
Ana

Creamy Pumpkin and Goat Cheese Pasta Sauce

2 small shallots, chopped
4 small garlic cloves, chopped
1 tablespoon olive oil
1 cup pumpkin puree
2 cups vegetable broth
1/4 teaspoon cinnamon
ground nutmeg (I never measure this, just grind a bit on top of the sauce)
1/8 tsp ground (rubbed) sage
1 to 2 oz goat cheese (again, I didn't measure, just took a blob and added to the sauce, I believe I used about 1 oz).
Salt and freshly ground black pepper to taste

Saute garlic and shallots in a pan until soft. Add pumpkin puree, broth, cinnamon (it might sound weird the cinnamon in here, but I promise, it taste good!), nutmeg, salt and pepper to taste. Bring sauce to a boil, add goat cheese and mix to incorporate. Add your favorite shape of cooked pasta to sauce and toss, serve with grated Parmesan cheese.
(We used bucattini, but I think penne pasta would be awesome with this sauce!)

Wednesday, September 08, 2010


Zucchini, Goat Cheese and Herbs Savory Bread

Another one of Elvira’s delicious savory bread! This one I have made more than once, usually in the summer when the zucchini and herbs are plentiful. It is a nice dish for a quick weeknight meal, and you can even prepare ahead of time which makes it even better. Totally helpful to come home from soccer practice and have something delicious waiting for you, no?!!

Just as with the sun-dried tomatoes bread the combination of flavors here is delicious, plus tell me: what doesn’t taste good with goat cheese??? Goat cheese is one of my favorite cheeses and here it really shines with the herbs, totally delicious!

Easy and simple to make, so much so that I am even going to keep this post short so you can go ahead and make it yourself, I am sure it is going to be fast and so rewarding that just like us you will be making this over and over, for many summers to come!

Enjoy!

Ana


And, for my Brazilian friends, you can see the recipe in Portuguese over at Elvira's blog by clicking here!


Since we are back in school I also made some in fun shapes and froze to use in future lunchboxes! yum!


Zucchini, Goat Cheese and Herbs Savory Bread

(adapted from Elvira’s Bistro)


100 grams all purpose flour

100 grams whole wheat flour

1 teaspoon baking powder

3 eggs

50 grams grated parmesan cheese

50 ml extra virgin olive oil

150 ml milk

100 grams goat cheese, chopped or crumbled into chunks

3 tablespoons chopped herbs (I used basil, parsley and oregano)

1 zucchini, grated

Salt and pepper to taste


Preheat oven to 350F. Grease and flour a loaf pan.

In a large bowl mix the flours, baking powder, a bit of salt (1/3 teaspoon) and pepper. Add the eggs, olive oil and the milk and mix together until you have a smooth batter. Add the grated zucchini, grated parmesan cheese, herbs and goat cheese and mix gently with a wooden spoon until all is incorporated.

Pour batter into prepared pan and bake at 350F for about 40 to 45 minutes until golden, or until a toothpick (or the tip of a knife) inserted in the center comes out clean. Let it cool for about 10 minutes in the pan before unmolding. Let it cool before serving.

Thursday, August 19, 2010

Savory Feta, Basil and Sun-Dried Tomatoes Bread

When I saw this recipe posted on Elvira's blog I knew I had to try! I have made another savory bread she had (posting to come!) and we really liked. Since we love all the flavors on this one I knew just by looking at the recipe that it would be a winner, and I wasn't wrong.
I made it on the same day she posted and we all loved it here, an absolute success with thumbs up from the boys!
Since I could not contain myself I did change a couple of things here and there, but nothing that compromised the flavor.
It is a moist and very flavorful savory bread, very delicious! We had it as a light dinner, with a side of green salad with veggies you don't need much more.
Plus it is super easy and simple to make and you only dirt one bowl, which are good things during summer break when you don't want to spend much time in the kitchen.
Hope you guys enjoy it as much as we did!
I am posting the recipe the way I did. To see Elvira's original recipe, which is in Portuguese (bonus to my Brazilian friends!) click here: Cake de Feta, Tomates Secos e Manjericao.
Enjoy!
Ana

Savory Feta, Basil, and Sun-Dried Tomatoes Bread

75 grams whole wheat flour
75 grams all-purpose flour
1 teaspoon baking powder
3 eggs
100ml extra virgin olive oil
150 ml milk
15 basil leaves, chopped
100 grams sun-dried tomatoes in oil, chopped
100 grams feta cheese (feel free to use more or less), crumbled or cut into cubes
Salt and pepper to taste

Preheat oven to 350F, grease a loaf pan, set aside.
In a large bowl mix together the flours and baking powder. Add the eggs, milk, and oil and mix everything together with a wire whip until smooth. Add a bit of salt and pepper to flavor the batter - just be light on the salt as the feta cheese contributes a good amount of saltiness to the bread.
Add the chopped sun-dried tomatoes, basil, and feta cheese and mix them into the batter with a wooden spoon (or spatula).
Pour batter into prepared pan and bake at 350F for about 35 to 40 minutes, until golden.
Remove from oven, let cool for about 10 minutes in the pan before removing from the pan. Cool on a wire rack.

(We didn't let it cool completely before cutting as we were hungry and it was smelling so good. The bits of warm cheese inside the bread were amazingly delicious, the flavors of this bread pairs really well together!)

Monday, June 07, 2010


Springtime Pasta with Homemade Ricotta

I love cookbooks, I have a thing for it and always find one more that I "need" to have!
However, even though I have many cookbooks and love to read and reread the recipes on them or on my favorite cooking magazines, for most of the time I use recipes and pictures more for an inspiration rather than something to follow strictly. For the majority of the recipes I choose to make end up tweaking a bit here and there and adapting when needed with what I have on hand.
To be quite true, what I have in the fridge is usually what dictates what I am going to make for our meals. I look in the ice box, a peek in the pantry, and I am out for a search of inspiration on said cookbooks and magazines!
The pasta pictured above was a case of a "let's see what is in the fridge" day. Armed with a bunch of spring veggies and some delicious homemade ricotta (my favorite!) I created the dish you see, which turned out to be pretty good, if I do say so myself!

First I set the oven on high and put some of the veggies I had in the fridge to roast: broccoli, carrots, yellow squash and asparagus - all seasoned with salt, pepper and olive oil. Meanwhile I set a pot of water to boil and cooked some whole wheat penne.
Once the veggies were roasted and the pasta was cooked I tossed them together, added a few marinated artichoke hearts I had left in a jar and seasoned everything well with salt, pepper, and lots of delicious extra virgin olive oil. A few blobs of ricotta and grated fresh Parmesan cheese completed our one dish deliciousness of a meal! Could not have asked for more!
And this coming from someone who is not a big pasta fan. Seriously, pasta is something that I never crave or wish for, I actually never liked pasta until I tried the whole wheat variety, I find it a lot more flavorful and it has a bite to it which I grew to enjoy. (Regular pasta to me doesn't taste like anything... blech!) But I still don't eat pasta frequently, I need to be really in the mood to gobble it up.
To me this dish proved how the simplest foods end up being the most delicious and flavorful ones. Roasted veggies are just the best, and look at the bright colors! Plus there are few things that good cheese doesn't make it all the better, right?!
Enjoy!
Ana

Monday, August 25, 2008

Caprese Salad

No mater how you present it, skewered in appetizer form, cut into cubes, with both tomatoes and cheese displayed in a sliced manner, Caprese Salad is one of my favorite summer dishes!
Here we had red and yellow tomatoes, both from out backyard, fresh basil leaves and the sinfully creamy and ultra delicious fresh mozzarella (I love this cheese!), all covered in great olive oil, salt, pepper and a touch of balsamic vinegar.... sooo good! I can have only this for a meal and be happy all day!
Ana

Wednesday, August 20, 2008

Grilled Vegetable Salad, one word: Yum!!

I am sorry I have been absent on these past few days... a sudden and unfortunate death of a dear family member just got me into a very sad state of mind and I was in no real mood to think much about anything else other than how fragile our bodies and life are. Cooking was done by a way of necessity and that's the reason I took this little break. However, life goes on, and here I am, back and with some more good food to share!
(Thanks for letting me vent a little about other aspects of my life here too!)

During the warm months our greatest culinary pleasure is being able to fire up the grill! Everything that comes out is so flavorful and delicious, plus there is no smells or much cleanup to be done inside, and the not-turning-on-the-stove/oven-on-an-absurdly-hot-day factor too!

It is a win-win situation which we truly enjoy! And one of the foods I love most done in the grill are vegetables. You can grill almost any veggie you like in there and the outcome is always tasty; it gets that "charred" flavor that you only get from the grill and there is no mystery on doing it: the easiest way is to simply cut your veggies in similar size pieces, then season them with salt, pepper and a decent amount of good olive oil and throw them in the grill. Keep an eye on them as some veggies do cook a lot faster than others, flip along the way and as both sides get those wonderful grill marks you have a healthy and flavorful meal that can be enjoyed warm or kept for later to be eaten at room temperature or even cold (grilled veggies are great cold too!).

I make grilled vegetables all the time during summer and we never get tired of it!
The ones I like the most are eggplant, red bell peppers and zucchini/yellow squash, which by the way is what I used in the salad pictured above (minus the pepper on that day though!). Corn is also delicious, as are asparagus and onions too!

For the salad I grilled some eggplant and squashes that I had from the farmer's market, to them I added some grape tomatoes from our backyard and little pieces of fresh/soft goat cheese (which I absolutely looooove!), then I topped it all with a simple Dijon mustard vinaigrette that I made by mixing roughly 2 parts rice vinegar (I find this kind of vinegar to be lighter in taste) to about 1part olive oil (a tablespoon or so), a teaspoon honey, a teaspoon Dijon mustard, and salt and pepper to taste.
It was the perfect finish to complement the salad, which we enjoyed a whole lot, the vinaigrette added at the end really gave it some extra nice flavors, a great tang to the soft veggies! (Balsamic vinegar is another way I like to dress up roasted vegetables too!)
To me there is no easier or better way to have fun with the vegetables during the summer than making salads, and a grilled one is always welcome too!
Enjoy!
Ana

Tuesday, August 12, 2008

Garden Muffins
First of all I have to mention that my picture doesn't do justice to the goodness of this recipe. That being said, I will only add that these muffins were very good!
The recipe came from the Cooking Light Bulletin Boards, posted by "Canice", and the cornmeal flavor combined with the veggies and Parmesan cheese created some delicious savory muffins.
We really enjoyed these, I made half recipe and they were gone in a matter of seconds!
The Parmesan cheese was my touch to improve the original recipe, so feel free to omit it if you don't like, but we liked the flavor it added a whole lot, especially to the top, where I sprinkled a tad more Parmesan on each of the muffins. As I ate mine I was even thinking about adding pieces of cheese the next time I would make them, which will probably be soon as it has been requested already!
They are very simple but flavorful as could be. Plus it is easy to make, and you could even change the veggies accordingly to what you have on hand - yellow squash instead of zucchini, adding some corn bits would enhance the cornmeal flavor, even peas would be nice here too. These are a great complement to soup or salad, just what you need to round up a light meal!
Ana


Garden Muffins
(Adapted from "The City Gardener's Cookbook" )

1 cup flour
1 cup yellow cornmeal
1 Tbsp sugar
2 tsp baking powder
1/2 tsp salt
1/4 cup grated Parmesan cheese (can add more if desired!)
1 egg
3/4 cup milk
1/4 cup oil
2 Tbsp butter, melted
1/2 cup peeled, seeded, and finely diced tomatoes
1/2 cup grated zucchini
1/2 cup grated carrot
1/4 cup chopped green onion

Preheat oven to 400F. In a medium bowl, combine the flour, cornmeal, sugar, baking powder, Parmesan cheese, and salt and mix well. In a small bowl, beat together the egg, milk, oil, and butter. Stir in the dry ingredients. Add the tomatoes, zucchini, carrot, and green onions, blending thoroughly. Spoon the batter into greased muffin tins, filling about three-quarters full. Bake 20-25 minutes, until golden brown. Serve warm.
Makes 1 dozen muffins.

Saturday, June 21, 2008

A quick bite before we leave...

Yay, we are going to Brazil!
Yes, we used to visit the family at the end of the year, but now with Matheus in school (he is going to 1st grade already!!) our vacation time got transferred to June/July. The only drawback is that now it is winter there and I really don't like the cold, but visiting the family is always so much fun that their love will certainly warm us up during our entire stay!
We are so excited! Even with all the packing and the "I-think-I-am-forgetting-something" feeling we can't wait to leave for the airport tomorrow!
This time we will stay for a whole month, so I will probably won't post much, but I will certainly try to come here and say hi, and maybe even post some pictures from our trip.
And right now, before we leave, I just wanted to post this Sandwich, which is quick to make but filling and delicious, perfect for the warm weather we are having now, when turning on the oven/stove is not something we want to do.
My sister sent me this recipe, which comes from a Brazilian cooking magazine called "Claudia Cozinha", last year and I always make it when I feel like having a sandwich. It is light and refreshing, makes you feel satisfied and it is also quite healthy and good for you!
Feel free to adapt/adjust the ingredients and add/omit things based on what you have at home. This sandwich is very versatile and can even be used as a base for you to create your own version!
On the one I have in the picture I used a mix of salad leaves instead of arugula, didn't add the mushrooms and the sesame seeds, as I didn't have any of those at home. Also, I only used 2 pieces of bread, as that is definitely enough for me (and for Matheus! Yes, I made one for him and he loved it, especially since it had egg inside and he loves hard-boiled eggs!)
Hope you enjoy too, and I will come back to post as soon as we land in "Terras Brazilis" and have sort of organized ourselves there!
See you all soon!
Ana

Vegetarian Sandwich with Orange Dressing
(Adapted from Claudia Cozinha)

1/4 cup freshly squeezed orange juice
3 tablespoons olive oil
salt to taste
3 slices good whole wheat bread
1/2 cup grated carrots
1/4 cup walnuts, broken into small pieces
1 tablespoon sesame seeds (toasted)
5 basil leaves
1/4 cup sliced fresh mushrooms (I didn't use, didn't have any at home...)
1 hard boiled egg, sliced
1/3 cup cottage cheese
1/2 cup arugula leaves

In a small bowl whisk together the orange juice, olive oil and the salt until you have a homogenized mixture, set asidde.
Lay one slice of bread on a plate and on top of it put the following ingredients in layers: grated carrots, walnuts, sesame seeds, basil, and over it pour half of the orange juice dressing. Lay the other slice of bread on top and then add the mushrooms, sliced egg, cottage cheese and the arugula. Pour over the remaining orange juice dressing and top with the last slice of bread. Enjoy!

Monday, February 11, 2008

Baked Shrimp with Tomatoes and Feta

Shrimp is something that both Matheus and my husband really like. I talk about having shrimp for a meal and they are as happy as can be!
And it was certainly not different with this dish. As I mentioned the above sea protein they could not wait for lunch, and were not even worried about what kind of dish I was going to make.
Luckily,
Baked Shrimp with Tomatoes and Feta was a hit and lunch was an absolute success!
First you make a simple and easy tomato sauce with canned tomatoes, onions, garlic and herbs: parsley and dill. Then shrimp and feta cheese are added and the dish goes to the oven for a few minutes more. And that's it!
So easy and soooo flavorful! I enjoyed this so much that I could not believe how good it was!
I like shrimp, but I am not a big fan of canned tomatoes. I
love tomatoes, the fresh ones, during summertime, when they are at their peak of goodness. Maybe it is just me, but I find canned tomatoes to be extremely acidic and... well, I think they taste like, hum... the can.
Sorry, I know, canned tomatoes are a staple and a life saver during winter months, I agree, but it might be just me, so just ignore my canned tomato rant and let's move forward, shall we?!
Anyways, my surprise with this dish was exactly the tasty sauce. The dill and parsley paired so well with the shrimp and tomatoes flavors that I could not stop raving about it, really, really good!
The cheese added just the right amount of saltiness, nicely complementing the flavors of everything else. The canned tomatoes turned out into a sauce that was not bad at all!
We all gave thumbs up for this dish here at our home, pretty easy, delicious and good for you, just like all the other recipes that came from Ellie's book! Yumm!!
Ana

Ps: I am sorry about the picture, I should have taken a better one... actually, I was supposed to plate and take another picture, but we were all so excited to eat that I ended up forgetting to do it, just to find the camera sitting on the counter ready to click... oh man!

Baked Shrimp with Tomatoes and Feta
(Recipe adapted from Ellie Krieger's cookbook The Food You Crave)

1 tablespoon olive oil
1 ½ cups diced onion
2 garlic cloves, minced
2 (14,5oz) cans diced tomatoes, with their juices (I added 1 ½ can and it was enough sauce for us, too much more and it would have been tomato soup with shrimp swimming in it, so use your judgment on this one!)
¼ cup minced fresh parsley
1 tablespoon minced fresh dill (or 1 teaspoon dried)
1 ¼ pounds shrimp, peeled and deveined
¼ teaspoon salt, plus more to taste
¼ teaspoon freshly ground pepper, or more to taste
2/3 cups crumbled feta cheese (3 ounces) (I didn't measure mine, but I guess I used less than this amount)

Preheat oven to 425F.
Sautee onion and garlic in the olive until softened, about 3 minutes. Add the tomatoes and bring to a boil, reduce heat and cook for about 5 minutes, until tomato juices thicken a little.
Remove from heat, add parsley, dill, and shrimp and season with salt and pepper. Sprinkle with the feta cheese and bake until shrimp is cooked and cheese melts, about 12 minutes.
Serves 4.

Saturday, January 05, 2008

Chicken Stuffed with Garlic and Goat Cheese

As promised, here I am with new recipes to share! And what a better way to start this year's posts than with a recipe involving goat cheese??? I love, LOVE this cheese, it is so creamy and tangy, one of my very favorite cheeses of all!
I had high hopes when I first spotted this recipe, and it certainly did not disappoint. Chicken Breasts Stuffed with Garlic and Herbed Goat Cheese is a very flavorful and delightful dish. The chicken was moist and perfectly cooked, and although the goat cheese mixture did escape a little from the insides I still did not complain because it created a wonderful sauce on the bottom of the pan, in which the chicken was sitting in, so it was completely infused with the flavors, inside out.
The recipe comes from Cooking Light and is very easy to prepare. Chicken is stuffed with yummy, creammy deliciousness, then browned on the stove top and finished in the oven.
Perfection, so flavorful, so juicy, so good! No need to say it will show up in our tables many times to come!
Ana

My notes and a tip before you read on: I had plain goat cheese at home (prefer buying plain, this way I can flavor it however I want!!), so I chopped some fresh basil, parsley, and rosemary and mixed into the cheese. No need to fuss here, use the herbs you have at home and I assure you it will turn out great! (I wouldn't however use dried herbs for this, I believe fresh would be best, but if that's all you have on hand, then why not try, right?!) Also, I made half recipe.
My tip for this recipe: go ahead and roast two garlic heads and save the other one for later use. I like to do this because I love roasted garlic, as it adds lots of flavor to savory dishes and having it ready is very convenient. After roasting it, let cool; then squeeze the garlic out of the papery skin, place the cloves laying them flat on a small zipbag and freeze it. This way when you need/want some roasted garlic they will be ready for you. Plus, laying them flat into one layer in the bag helps a lot, as you can just "break" apart (from the sort of "garlic slab" you made) the amount of garlic you need at the time without needing to defrost the whole thing!


Chicken Breasts Stuffed with Garlic and Herbed Goat Cheese
(Adapted from Cooking Light, October 2007)

1 whole head garlic
1/3 cup goat cheese with herbs (3 ounces), left at room temperature to soften
6 skinless, boneless chicken breasts halves
1/2 teaspoon kosher salt
1/2 teaspoon freshly grounded black pepper
4 teaspoons olive oil

Preheat oven to 350F.
Cut a small "lid" from the bottom of the garlic (to facilitate squeezing later) head, wrap it in aluminum foil and roast for about 1 hour. Let cool, squeeze garlic cloves and discard skins.
In a small bowl combine garlic pulp and goat cheese (plain cheese and herbs if you make it like me!), set aside.
Make a horizontal cut into the thickest part of the chicken breast to form a sort of "pocket" and stuff 3 to 4 teaspoons of cheese into each breast. Sprinkle chicken with salt and pepper.
Heat oil in a large skillet, add chicken and cook 3 minutes, until browned. Turn chicken over and put skillet in the oven, bake at 350F for about 20 minutes (start checking around 16 minutes so it doesn't overcook), or until a thermometer register 165F. Let it rest 5 minutes, serve and be happy!!
Yield: 6 servings

Saturday, June 23, 2007

Grilled Eggplant Stacks

We just had this for lunch and I had to run and post the recipe here. This dish was extremely flavorful, really good, truly delicious!!!
I don't think I have enough words to express how much I loved this one! I already liked all the components by themselves (c' mom, grilled veggies are the best, aren't they?!!!), so there was no way we would not enjoy this one. Sooooo yummy!
It is not difficult to put together and it has just the right ingredients to make an awesome and delightful summer dish.
It takes a little prep time to prepare the ingredients and grill them, but that's all you need to do. The rest is assembling and enjoying!
The stars of this dish for me was first of all the herbbed goat cheese, and then the balsamic-wine syrupy reduction. The cheese made it taste even fresher and it was so delicious on its own, I measured the 2 ounces asked in the recipe and then threw a little more in there just so I could have a tad extra, and also because I love goat cheese and I wanted a good portion of it in my "stack"!
The balsamic reduction was amazingly good. So rich, so syrupy, it made me feel like I was a very good chef, really, it tasted "chic"!
This could be easily be served as part of a vegetarian meal, as I actually had mine with tofu and brown rice, while the boys opted for red meat.
Making dishes like this makes me happier than ever, and it makes me love cooking more and more; because I know it is really hard to find such tasty food around. It would certainly cost me a fortune and no one could ever guarantee it would be this fresh.
This is why I love cooking the most. Treating my family with healthy and delicious food and seeing their happy faces is much more than I could ever ask for!
Enjoy!
Ana


Grilled Eggplant Stacks
(From Cooking Light Magazine, July 2007)

1 (1-pound) eggplant, cut crosswise into 1/2-inch-thick slices
3/4 teaspoon salt, divided
1/4 cup balsamic vinegar
1/4 cup dry red wine
1 tablespoon brown sugar
1 small zucchini (about 4 ounces)
1 small yellow squash (about 4 ounces)
1 large red bell pepper, quartered lengthwise and seeded
1 teaspoon olive oil
1/4 teaspoon freshly ground black pepper
1/4 cup (2 ounces) goat cheese
1 tablespoon chopped fresh basil
1 teaspoon chopped fresh oregano

Place eggplant slices in a colander. Sprinkle evenly with 1/2 teaspoon salt; toss well. Let stand 10 minutes. Rinse slices thoroughly; dry with paper towels.
Combine vinegar, wine, and sugar in a small saucepan over medium heat; bring to a boil. Reduce heat, and simmer until reduced to 1/4 cup (about 8 minutes).
Prepare grill.
Trim ends from the zucchini and yellow squash; slice each lengthwise into 4 (1/4-inch-thick) slices. Flatten pepper pieces with hand. Brush eggplant, zucchini, squash, and pepper pieces with oil; sprinkle with remaining 1/4 teaspoon salt and black pepper. Place pepper pieces, skin side down, eggplant, zucchini, and squash on a grill rack; grill 8 minutes or until tender, turning once.
Combine cheese, basil, and oregano.
To assemble stack, place 1 eggplant slice on a plate; top with one-fourth of cheese mixture. Lay one strip of yellow squash and one strip of zucchini side by side. Drizzle with 1 1/2 teaspoons balsamic mixture. Top with one pepper piece. Top with one eggplant slice and drizzle with 1 1/2 teaspoons balsamic mixture. Repeat procedure three times with remaining eggplant, cheese, squash, zucchini, peppers, and balsamic mixture. Let stand 5 minutes before serving.

Wednesday, May 30, 2007

Italian Panzanella!!!

We just had it for lunch today and I had to come here and post it to share!
I saw the recipe at Fernanda's blog and it looked so pretty and refreshing that I had to try.
It's been nice and hot here these past few days, just as we like it, so fresh and simple meals are all we need to cope with the heat.
This salad has the bonus of being made in advance and enough protein from beans and cheese that enable you to have it as a one course meal.
And I have to say that this was one of the best vegetarian salad meals I have ever had!!!!
Really good and yummy, I loooooved the flavor, which although very simple were tasty enough to keep me going for more.
I made half recipe in the morning and had with Matheus for lunch, we polished off the entire thing, so good!
The crusty bread really absorbed the flavors and was Matheus' favorite part. I just loved white beans and those creamy white pearl together with the tomatoes were my favorite by far!
My only change was to use thinly sliced zucchini instead of the cucumbers and it was also great this way! (I do prefer zucchini and it was what I had on hand).
For those who don't like the raw onion sharp flavors I leave here a tip, which I use often as Matheus is not the biggest fan of the onion in the raw: after slicing the onions put them in a small container filled with cold water and a pinch of sugar, leave there while you prepare your dish - the onions will loose the sharp/spicy bite and get more of a mellow flavor, revealing some of its natural sweetness.
I know more people are going to like this one, it is perfect for the summer days when we don't even want to think about turning on the stove, and it will certainly be made over and over around here for the months to come!!
Enjoy!!
Ana

Italian Panzanella

For the recipe in English click here!

For the recipe in Portuguese, and a quick look at Fernanda's awesome blog, click here!

Wednesday, March 21, 2007

Arancini Balls

I made these last week and they were sooo good that I already want to make them again! I actually almost cooked a lot more brown rice than usual at the beginning of the week just to have some leftovers for this! :o)
These Mozzarella-Stuffed Arancini were delicious, creamy and gooey from the mozzarella on the inside and crusty on the outside, yes, the outside got incredibly crispy. I was amazed with the results, as were the husband and Matheus, they both loved it too and there was no leftovers after dinner on that day! Yum!
Arancini is a Italian savory concoction; rice balls stuffed with cheese and usually made with leftover risotto. I made this one with brown rice, but if made with aborio rice (or risotto rice) it would certainly be even better, and probably even creamier. I don't know if this recipe is true to its origins, but is definitely one worth trying. Also, Arancini are normally fried, but these were just how I like, going directly to the oven, they came out great and I loved them being made this way too. You may save some calories, and in my case, some stomachache too.
As usual, I adapted the recipe accordingly to what I had on hand, but nothing too major that would alter the end results so much. First, I used leftover cooked brown rice that I had on the fridge instead of cooking some instant rice as the recipe calls for, second I used grated Parmesan instead of Romano and omitted the green onions (didn't have), and finally, I used some regular mozzarella, as I didn't have any marinated ones around. I sort of eyeballed the amount of rice and halved the recipe. And even though I changed the recipe a bit they still came out great!
Easy and delicious, simple to make and to put together when you have rice and marinara sauce hanging around. We enjoyed this a lot, hope you like it too!
Ana


Mozzarella-Stuffed Arancini
(Adapted from Vegetarian Times, February 2007)

1 1/2 cups instant brown rice
4 green onions, divided
2 cloves garlic, minced
2 eggs, lightly beaten
1/2 cup chopped parsley
1/3 cup grated Romano cheese
2 cups breadcrumbs
16 marinated fresh mozzarella balls
Olive oil for drizzling
Marinara sauce for serving

Combine rice, 1 green onion, garlic and 3 1/2 cups water in a saucepan. Boil, reduce heat, cover and simmer 15 to 20 minutes, or until rice is soft and slightly sticky. Remove from heat, remove green onions and let cool.
Preheat oven to 425F. Line a baking sheet with foil or use cooking spray. Chop remaining green onions.
Fold eggs, parsley, cheese and onions into rice. Spread the breadcrumbs on a plate.
Place about 1/4 cup of the rice mixture in the palm of your hand, shape it into a ball around one mozzarella ball. Roll your arancini in the breadcrumbs and place them on the prepared baking sheet.
Drizzle the balls with olive oil (alternatively, you can use the oil from the mozzarella marinade for this) and bake for 20 to 25 minutes, or until browned on the outside.
Warm marinara sauce and serve with the arancini balls, garnish with parsley if desired.

Wednesday, February 21, 2007

Ratatouille Tart

The moment I saw this recipe I knew I had to try it. Oh my, this was SOOOOO good! I have no words to describe how tasty and yummy this tart is!
I made it today for lunch and just had to come here and post the recipe to share with you guys.
Cornmeal-Crusted Roasted Ratatouille Tart is full of delicious vegetables that are slightly roasted before the tart is assembled, which makes them moist and gives the tart a rich taste at the same time.
Super good, seriously, I looooved this recipe! The cornmeal crust was simple to make and very easy to work with, plus it was delicious! The corn taste complemented the vegetables really well, it was almost as if corn was another veggie in there; the crust was crispy all over, even on the bottom. Pre-baking the crust ensured it turned out crunchy and not soggy, even though the vegetables were nice and moist. Oh, and the recipe says to use a food processor, but since I don't have one I made my dough by hand and it turned out great (again, so yummy!!!).
Matheus loved this as well and even asked if I could repeat the recipe again this weekend! Yay! If I have everything on hand by Saturday, then why not, right?!!
As usual, I followed the recipe but made a few alterations based on what I had at home, but this time they were very minor changes: I used a mix of leeks and onions instead of shallots, and added some garlic to this sauteed onion thing; also, fontina cheese was used instead of mozzarella, and since I did not have fresh basil I sprinkled the veggies with a dried Italian herb mix. Oh, and for the crust I used 1/2 teaspoon kosher salt, and will do it again, as the crust turned out very flavorful this way.
I don't believe my changes were too significant in terms of altering the flavors at the end as the major ingredients were all in there, but I am pretty sure this would taste even better with the fresh basil in it. One thing I did was to sprinkle a bit of salt on each layer of veggies, before adding the remaining ingredients on top, just to make sure that each layer would get the proper amount of seasonings.
We really enjoyed this recipe today! It is perfect for a light lunch, although after 3 pieces I ended up not feeling as light as I should!
Enjoy!!
Ana


Cornmeal-Crusted Roasted Ratatouille Tart
(Recipe by Ellie Krieger)

Crust:
2/3 cup yellow cornmeal
1/3 cup whole-grain pastry flour
1/4 teaspoon salt
2 tablespoons butter
2 tablespoons canola oil
3 tablespoons water

Filling:
2 tablespoons plus 1 teaspoon olive oil
2 shallots, thinly sliced (about 1/3 cup)
Cooking spray
1/2 pound thinly sliced eggplant rounds (about 1/3 medium eggplant)
1 zucchini, sliced into 1/8-inch rounds (about 8 ounces)
3 medium tomatoes, sliced thinly
1/4 teaspoon salt
1/4 teaspoon freshly ground black pepper
3 ounces shredded part-skim mozzarella cheese
1/4 cup shredded fresh basil leaves
1/4 cup freshly grated Parmesan

For the crust:
Preheat the oven to 350 degrees F.
Combine cornmeal, pastry flour, and salt in the bowl of a food processor. Pulse to incorporate. Add butter and oil and pulse about 20 times, until mixture resembles small pebbles. Add water and pulse until mixture forms a loose dough. Remove dough from processor and press into bottom and about 1/8-inch up the sides of a 9-inch tart pan with a detachable rim. Press aluminum foil into the bottom and sides of the pan on top of the dough and weigh down with uncooked rice or pie weights. Place tart pan on a baking sheet and bake for 10 minutes. Remove from oven and remove rice and foil. Return to oven and bake for an additional 5 minutes, or until no longer shiny and wet. Remove from oven and let cool.

For the filling: Increase the oven to 400 degrees F. Heat 1 teaspoon of olive oil in a nonstick pan over medium heat; saute shallots until soft, about 5 to 6 minutes. Spray 2 baking trays with cooking spray. Arrange the eggplant, zucchini and tomato slices on the trays in a single layer and brush with the remaining olive oil. Season with salt and pepper, and roast the vegetables until soft but not browned, about 15 minutes. Remove the vegetables from oven and cool.

Lower the oven temperature to 350 degrees F. Lay the eggplant slices in 2 layers on the bottom of tart; cover with 1/3 of the mozzarella cheese and some of the shredded basil. Add the zucchini and shallots, top with another 1/3 of the mozzarella and basil, then the tomatoes. Top with rest of the mozzarella cheese and the Parmesan. Bake for 25 to 30 minutes, or until cheese is melted and vegetables have further wilted. Remove from oven, let cool for 5 minutes. Serve warm.


Tuesday, January 16, 2007

Yummy Bread!

I definitely haven't posted enough this year, and I truly miss posting here, but things did go a little crazy this past few weeks around here and I barely had time to sit and plan my menus and figure out the recipes I wanted to try. Plus, since we are going for a few weeks we had to enter the mode "eat what is in the fridge before we leave" and our meals has been quick and simple, but tasty nonetheless!
And although I didn't post much, I just had to come here and give you all a Hello and a quick post before we leave tomorrow, because I know I won't be able to post anything in the next few days.
So, here comes a very simple and quick recipe, which I made not just because I had ham and cheese in the fridge, but also because it looked pretty and delicious at Valentina's blog, which got it originally from Silvia's blog Doce Casinha.
This is a recipe that comes from Silvia's mother in law, and let me tell you, the lady does have great taste! The dough was super easy to work with and after baked it turned into a nice light and fluffy bread, very pleasant to eat. Both my husband and my son loved it, I made half the recipe and got about 5 nice "rolls" filled with ham, cheese, a bit of oregano, and sun dried tomatoes, so be prepared because the whole recipe provides a nice yield.
I didn't know how to properly name the bread, I have so much in my little head going right now that I couldn't think of a way to describe this sort of filled and rolled bread in English, so I am sorry... any suggestion will be appreciated! I guess it is sort of a "Stromboli", right? (not really sure though)
Thank you both so much, Valentina's for pointing me to Silvia's nice blog, and of course thanks Silvia for sharing your great family recipe with us all!!
I used ham and cheese, but the combinations for fillings here are as varied as can be. I bet it would be also good with turkey and cheese, or even spinach and ricotta/some other cheese, yum! (I am planning to try different fillings when I came back from Brazil!)
You know a good recipe when it is very forgiving and let you adapt with the ingredients you have in your own "in-need-to-clean-fridge"!!
Enjoy, and see you all soon, from the sunny and "full of family" Terra Brasilis!!
Ana

Oh, and if you would like to take a peek, the original recipe is posted in Portuguese here.

Silvia's Mother In Law Bread

About 2 pounds all-purpose flour (more or less depending on your dough)
3 eggs
1 tablespoon sugar
1 cup oil
14 grams active dry yeast (2 packages)
2 cups warm water
Salt to taste

For the filling I used shredded mozzarella cheese, pieces of ham, and some sun dried tomatoes that I soaked in some warm water to plump up. I also sort of seasoned my filling with a little bit of salt, pepper, and dried oregano. But use your imagination, because there are definitely other combinations that would taste great here!

Dissolve the yeast in the warm water, add the sugar and let sit for about 5 minutes. Add oil, eggs and salt and mix well. Little by little add the flour until you get a nice workable dough that doesn't stick to your hands. Put dough into a clean bowl and let it rise until it doubles in volume (1 to 2 hours).
Open dough into a rectangle, sprinkle with your filling of choice and roll it like a cake roll. Brush top with egg wash and bake at 350 until golden on top.

Sunday, December 10, 2006

Roasted Squash, yum!!

This was a dish I made this weekend and came out very good. I don’t have an actual recipe for it, but more a method of preparation for roasting the squash.
Butternut is by far my favorite of the winter squashes. It is sweet and creamy, and when roasted it gets mellow and better tasting yet. I really like this squash, especially when roasted and pureed into a soup, but baked like this, into chunks, it became so soft and intense in flavor that each cube provided the most pleasant taste sensations to my taste buds.
I peeled, deseeded, seasoned with olive oil, salt, and pepper, and roasted the squash at 400F for about 40 minutes. I threw in a diced red pepper into the oven with the squash at the last fifteen minutes of the baking time, just to get an extra flavor in there. The peppers got mellow and sweet, soft and delicious as only red bell peppers can get, plus the flavor went really well with the squash.
After roasting, the squash and peppers can be tossed with simple balsamic vinaigrette, to punch up the flavors even more. I then laid them on top of a bed of fresh spinach (seasoned with salt and pepper) and sprinkled with crumbled goat cheese.
The salad was delicious, tasty, and just talking about it is making my mouth water for some more.
I guess I will have to buy some more butternut squash this week!
Ana

Baked Pasta

Another weekend, and here I come with one more pasta dish... however, this was actually the recipe I made a couple Sundays ago. Yeah, I know, I have been a little slow with my postings, but I had so much going on this past week that among helping friends and taking my son to the doctor (winter is hard on the poor children… I hate cold weather!) I barely had time to get all my things done. But finally it seems that this week things will be better, and I sure have accumulated a few nice recipes to post.
Today it is Three Cheese Baked Pasta. Good, yummy, and if you like pasta as my husband does, then it is pure comfort food. He liked it a lot, and Matheus did too!
It is quite simple to make, and the flavors are the basic Italian ones, with the addition of cubes of provolone cheese that melt into little pockets of goodness throughout the cheesy baked dish. The ingredients blended together really well into an ooey gooey baked pasta concoction, which was easy to make and delicious to eat!
I love ricotta, and it makes for a good part of this dish, so I used my favorite, the homemade one. Make sure you use a good ricotta cheese here, as I am pretty sure it does make a difference.
The one ingredient that I don't actually think added much flavor wise to the dish were the sun-dried tomatoes. They kind of got lost into the sauce and you couldn't taste its flavor unless you bite into one. I guess I would prefer to have used my sun-dried tomatoes in another recipe where they could impart more of their great flavor and be more noticeable to my palate.
A basic baked pasta recipe, that brought happy smiles to the table in both my "boys" faces!
Ana

Three Cheese Baked Pasta (Adapted from Cooking Light, December 2006)
1 tablespoon olive oil
1 1/4 cups diced onion
1/3 cup diced carrot
4 garlic cloves
1/4 cup chopped sun-dried tomatoes (without oil)
1 1/4 teaspoons chopped fresh or 1/2 teaspoon dried thyme
2 (28-ounce) cans diced tomatoes, undrained
1 1/2 cups (6 ounces) grated fresh Romano cheese, divided
1 cup part-skim ricotta cheese
1 tablespoon chopped fresh parsley
1 large egg white, lightly beaten
1 pound uncooked penne
1 cup (4 ounces) diced provolone cheese
Cooking spray

Preheat oven to 400°.
Heat olive oil in a large nonstick skillet over medium heat. Add onion, carrot, cook 10 minutes or until onion is tender, stirring frequently. Add garlic; cook for 1 minute, stirring constantly. Add sun-dried tomatoes, thyme, and diced tomatoes; cook 25 minutes or until thickened, stirring occasionally.
Combine 1 cup Romano, ricotta, parsley, and egg white in a bowl.
Cook pasta according to package directions, omitting salt and fat. Drain; return pasta to pan. Add ricotta mixture to pan, stirring to coat. Add tomato mixture and provolone, tossing just until combined (do not over stir). Spoon pasta mixture into a 13 x 9-inch baking dish coated with cooking spray. Sprinkle with remaining 1/2 cup Romano. Bake at 400° for 25 minutes or until bubbly and top is browned.
Yield: 8 servings

Sunday, September 24, 2006

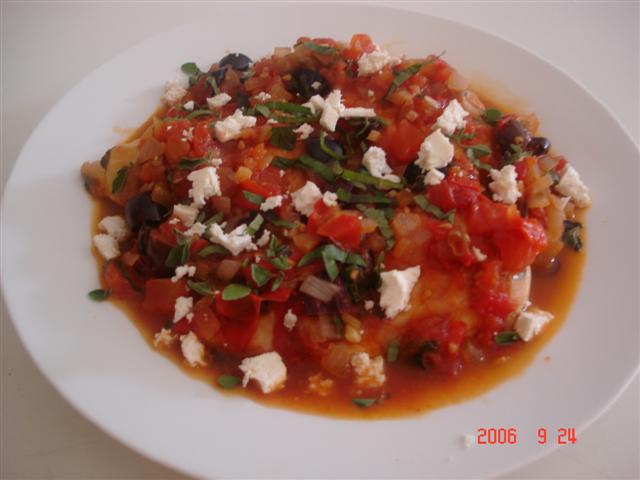
Greek Chicken

I can’t even start talking about how good this dish was. Oh my, this was without a doubt one of the best meals I had lately. Extremely full of flavor, the sauce was amazing, and the chicken perfectly cooked and full of the yummy flavors of the wine and lemon juice from its marinade.
Truly a dish to make when you have company over, as it wasn’t hard to make and you can have all things chopped up and ready in advance (as I did!). Just assembling and putting the dish together doesn’t take much time at all and could easily be done while you chat with your friends enjoying some wine.
I really loved this chicken dish; it was for me perfect in all senses. The tomatoes, onions, garlic, olives and the lemon juice, oregano, and wine from the marinade just blended together wonderfully making a scrumptious sauce, so flavorful that I literally licked my plate clean.
Awesome, awesome dish! We don’t go out to eat much (once a month, maybe…?), and this was better than many chickens I have had at restaurants.
I am so happy that I know how to cook, and I love doing it!
Ana

Note: if you haven’t seen the book this recipe came from then go check it out. It is so pretty, full of yummy recipes and nice looking pictures, I love this book! Even more today; after having my delicious Greek chicken! You can take a look at the book here.

Greek Chicken with Tomatoes and Feta
(adapted from Fresh Every Day by Sara Foster)

4 boneless, skinless chicken breast halves
Zest and juice of 1 lemon
1 cup dry white wine
2 tablespoons chopped fresh oregano
½ teaspoon salt
½ teaspoon ground black pepper
1 tablespoon olive oil
1 tablespoon butter
1 small onion, diced
4 tomatoes, chopped
2 garlic cloves, minced
½ cup pitted olives
6 basil leaves, cut into strips
2 ounces feta cheese, cut into cubes (1/2 cup)

Place chicken in a glass baking dish. Combine the lemon juice, zest, wine, oregano, salt and pepper in a small bowl. Pour mixture over chicken and let marinate (in the refrigerator) for a few hours or overnight.
Heat oil and butter in a large skillet; remove chicken breasts from marinade and place in the skillet. Reserve marinade to make the sauce.
Cook chicken turning only once, 5 minutes per side. Remove chicken from pan, put in a plate and cover with aluminum foil to keep warm. Put onions, garlic, and tomatoes in the skillet and cook until tomatoes and onion are soft, about 4 minutes. Add the reserved marinade and bring to a boil. Reduce heat; simmer sauce for 3 minutes, until it reduces by half. Season with additional salt and pepper if desired.
Return the chicken to the skillet and add olives and basil to the sauce. Simmer on low heat for about 6 to 8 minutes, or until chicken is cooked through and feels firm to the touch.
Transfer chicken and sauce to a platter, garnish with fresh basil and oregano. Sprinkle the feta cheese and serve.
Serves 4.

Wednesday, September 06, 2006

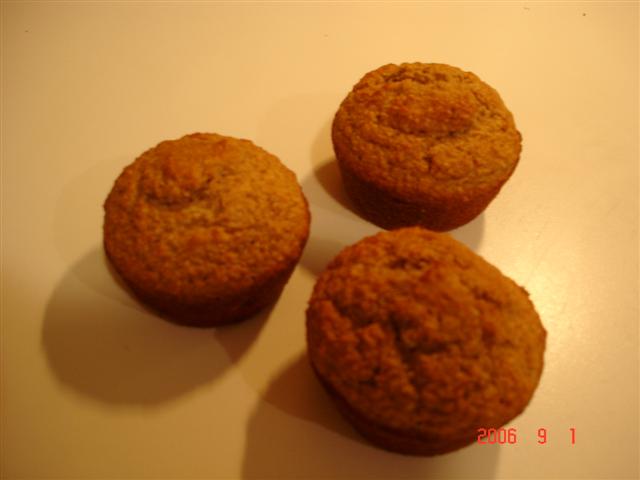
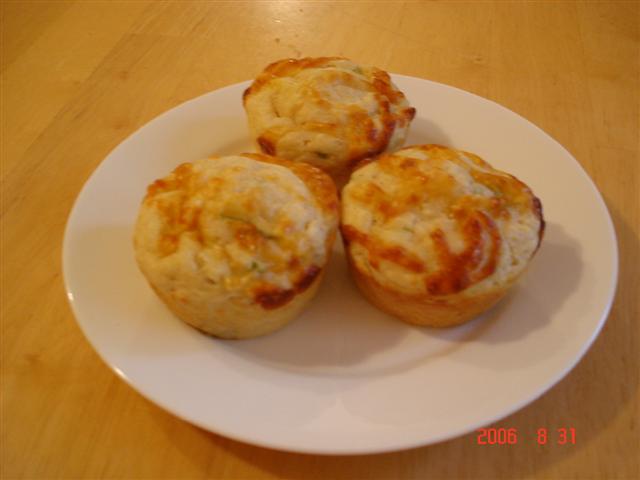
One sweet one savory!

I made two great muffin recipes this week, one of them sweet and the other savory, yes, a savory muffin indeed!
The first one, Apple Oat Bran Muffins was actually an adaptation I made on a pumpkin recipe, and it came out perfect!! I am definitely going to try it with the pumpkin next, but for now I will post my apple version, which we liked a lot. The muffins came out super moist and with a wonderful apple flavor and smell, even though it had applesauce in it. Next time I may add grated apples to the batter, even raisins might be good (I am not fan of raisins, but the boys like it and Matheus said he missed the raisins on his muffins… oh well!)
The second recipe came on the recent issue of my favorite magazine (Cooking Light). Cheddar Green Onion Muffins was a very nice surprise. I made the recipe one weeknight when I wanted something quick and savory for us to have as a snack. They came out quickly and delicious, very moist and cheesy. I believe a little more green onion would not hurt, as its flavor was not very pronounced, but we liked it as is!
I made mine in a bowl (no food processor here), and used white cheddar.
Two simple and tasty recipes today! How can one not love muffins?!?!
Ana

Apple Oat Bran Muffins
1 ½ cups unprocessed oat bran
½ cup firmly packed brown sugar
½ cup all-purpose flour
2 teaspoons baking powder
1 teaspoon cinnamon
¼ teaspoon salt
½ cup applesauce
1/2 cup skim milk (I used buttermilk)
1 egg
2 tablespoons vegetable oil

Combine first six ingredients in a large bowl; stir well. Make a well in center of mixture. Combine applesauce, milk, egg, and oil; stir well. Add apple mixture to dry ingredients, stirring just until moistened. Spoon into greased/sprayed muffin pans, bake at 400 degrees, for 18 to 20 minutes. (I got 8 muffins out of this recipe)


Cheddar Green Onion Muffins (Cooking Light/Sept 06)
1 ¾ cups all-purpose flour (about 7 3/4 ounces)
1/4 cup yellow cornmeal
1 teaspoon baking powder
1/2 teaspoon salt
1/4 teaspoon baking soda
1/4 teaspoon freshly ground black pepper
1/2 cup (2 ounces) shredded cheddar cheese, divided
3 tablespoons chilled butter, cut into pieces
11/4 cups fat-free buttermilk
2 tablespoons chopped green onions
1 teaspoon minced garlic
1 egg, lightly beaten
Cooking spray

Preheat oven to 375°.
Lightly spoon flour into dry measuring cups; level with a knife. Combine flour and the next 5 ingredients (through pepper) in a food processor; pulse 3 times to combine. Add 5 tablespoons cheese and butter; pulse 5 times or until mixture resembles coarse crumbs. Spoon mixture into a medium bowl. Combine buttermilk, onions, garlic, and egg; stir with a whisk. Add to flour mixture, stirring just until moist. Spoon batter into 12 muffin cups coated with cooking spray. Sprinkle evenly with remaining 3 tablespoons cheese. Bake at 375° for 18 minutes or until a wooden pick inserted in center comes out clean. Cool for 5 minutes in pan on a wire rack; remove from pan. Cool completely on a wire rack.
Yield: 12 muffins