Friday, December 24, 2010

HoHoHo!!

Remember when I said I had celebrated the end of my grad school semester by baking cookies and that I had made the best Chocolate Graham Crackers?
Well, I wasn't kidding, and I couldn't wait to share it with you. Simply because these were truly the best Chocolate Cookies/Crackers I have ever made and eaten, they are that delicious!
The recipe I found at Ashley's blog The Edible Perspective, a super nice blog which I really enjoy reading, plus Ashley has some awesome recipes in there, you should take a look!
I saw this Graham Cracker recipe at Ashley's blog and could not wait to try making them myself, so as soon as I was done with my school work I entered the kitchen and made a batch. Oh my, it was Chocolate Graham Crackers perfection! Even the dough was delicious just by itself, and since it is vegan we were able to indulge on it without any worries - and I tell you, Matheus and I did have a fair share of raw chocolate cookie dough. However, the baked crackers were even better!
Perfect texture and taste, both Matheus and I loved them!
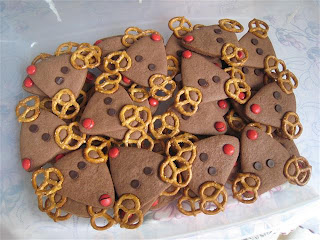
Matheus liked it so much that when I had to make reindeer cookies for his class' end of the year learning experience he asked me to make it with Ashley's recipe. Here is the result:


30 + cute reindeer cookies that I baked for the whole class, teachers and volunteers, we had a fun time at school!
To make the reindeer shaped cookies I used a circle cookie cutter which I bent into a triangular shape (the first reindeer cookie I made I shaped the dough into a triangle myself, that is the picture you see on the top of this post, using the cookie cutter made for a much more neat reindeer!). Cut out the triangles, stick two pretzels for the antlers, two chocolate chips for the eyes, and one red m&m candy for the nose and bake the cookies for about 10 minutes.
Couldn't be more simple and you cannot imagine how much the kids enjoyed this! Actually the teacher and the moms all really liked it too.
Since I followed Ashley's recipe exactly I am going to leave here the link and you can get the recipe at her website:
Chocolate Graham Crackers


I hope everyone is having a wonderful holiday season, and wish you all a Very Happy and Blessed Christmas! Ho Ho Ho to all!
Ana

Tuesday, December 21, 2010

Christmas Cookies!

Wow, where did the year go? Gosh, this semester was busy!
Going back to school was a lot more than I expected; grad school is intense, lots of huge, long papers to do, exams and more exams, projects galore, and all my free time was basically gone.
I have been doing everything I normally do as a mom and wife (cooking and cleaning, taking to school, picking up from school, taking to soccer, play dates, and I am also the room mom for Matheus' class) plus the new student life (studying in between activities), phew, I am just glad this semester is over. But I am also excited for the next one to come, I chose 3 classes that I believe I am really going to enjoy! :-)
I haven't posted in a while, but I have been cooking daily as I always did. Taking classes both on campus and online enables me to be more at home during the morning so I can invent and be creative in the kitchen. Thing is I find myself more and more cooking with my intuition and basic instincts. I have reached a point where I not only like to cook but I also know how to do it well enough to not be relying on recipes all the time anymore.
I surely still am feeding my love for cookbooks and added a few of them throughout the semester to my pile, but to be true I use them mostly for inspiration than anything else. Which is good as I can adapt the recipes I want to make to whatever I have at home, or to whatever flavors our palates prefer.
I just love knowing how to cook, it is a blessing I will tell ya!
You know how when you want to eat something and have been craving that dish for a while? See, when you know how to cook you just go into the kitchen and whip it up! This happened to me the other day, I wanted to eat pot pie, but I wanted it to be just the way I wanted. So when I had the time (and the phyllo dough defrosted!) I went into the kitchen and made the best pot pie ever. Ok, it was just the regular and usual one like the Pot Pie with Phyllo Topping I have posted here before. I adjusted the veggies to include my beloved (and in season!) butternut squash and used almond milk in the sauce (dairy issues friends), it was the most perfect pot pie I could have asked for. I ate pot pie like it was my job, and felt as happy as could be!
On days like this I am really glad I can cook - and that I like doing it too!
Anyways, last week I turned in my last project of the semester and what do you do when you are finally done and happy, with free time to boot?? You bake cookies, of course!!
I made the best chocolate graham crackers you could ever imagine, but the recipe will come in another post.
Today I want to share some of the other cookies I have been baking: Christmas Cookies! I love making these, I truly do, you have no idea how much. Decorating these cookies is therapeutic and something I could do for hours - which I do, as it takes a few good hours to decorate these babies.
This year cookies were made all in mini size, which I like not just because they are really cute, but also because they make the perfect bite when you want something festive and sweet. It is Holiday cheer without sugar overload! :-)
The recipe I used was my basic sugar cookie dough that I have already posted before (click here to see the original post), but I am adding it to this post so you all can see again.
They were decorated with royal icing, using the flooding method. I assure you, they are much easier to make than you could ever imagine.
You can decorate these anyway you want. This sugar cookie dough is super easy to make and the wonderful to work with, plus you don't need to wait for the dough to chill or anything. You make it and you bake it, and eat it too!
I made some with cocoa powder (the gingerbread man ones), but the consensus here at home was that the regular version was better.
Plus, I have better chocolate cookies to share with you on the next post, so stay tuned!
Hope everyone is having a good end of the year! Ho ho ho!
Enjoy!
Ana

Cookies in little tins to give to our friends as gifts!


Sugar Cookies
1 cup butter
1 cup sugar
1 egg
1 teaspoon vanilla
2 teaspoons baking powder
3 cups flour

Preheat oven to 375 degrees F. In a large bowl cream butter and sugar with electric mixer. Beat in egg and vanilla. Add baking powder and flour one cup at a time, mixing after each addition. The dough will be very stiff. Blend last flour in by hand. Do not chill dough. Divide dough into 2 balls, On a floured surface, roll each ball in a circle approximately 12" in diameter and 1/8" thick. Use cutters as guide; the dough should be only slightly thinner than cutter. Bake cookies on cookie sheet lined with parchment paper on top rack of oven for 7 to 8 minutes, or until cookies are lightly golden on the bottom.

Sunday, October 31, 2010

Happy Halloween!!!

Would you like some "worm pasta" for lunch today?

Or perhaps you would prefer to snack on some monster mouths??

Not that we like gross foods, but we do like to have some fun in the kitchen, and today we did have monster mouths for breakfast and worm pasta for lunch. And as weird (or gross) they may sound, they were delicious!
For the mouths it is as simple as can get, apple slices + almond butter (or pb) + mini marshmallows, quite a fun and delicious bite! (and with the exception of the marshmallows in there, also quite a nutritious snack. Nut butter + apples make a balanced snack with protein, fats and good carbs, plus all the goodness apples/fruits has to offer).
The pasta was homemade bucatini, the spaghetti-like one that has a whole in the middle and looks like a straw, and it was freshly made by the husband. It was fun making the pasta, and eating it too!
We added a bit of pumpkin puree to the pasta dough and it made the pasta incredibly delicious. You can actually taste the pumpkin, but it makes the dough soft and with a wonderful texture.
Then, being Halloween along with my obsession with pumpkin lately, we had to have a pumpkin sauce!
I made mine inspired on HEAB's pumpkin goat cheese sauce, and it turned out into a delicious Creamy Pumpkin and Goat Cheese Pasta Sauce!! I didn't follow the recipe posted by Heather, basically just got the idea from the combo of pumpkin and goat cheese, so I am posting here the way I did.
It could not be more simple or easy to make, and it was so good, I scraped every single bit of the sauce with a spatula before washing that pan. Oh, and adding a shaving of Parmesan cheese on top made this even better.
Hope you all have a great and safe Halloween! Matheus is beyond excited and can barely wait to go out tonight. At least now he has a belly full of nutritious food so a bite or two of candy won't hurt.
Happy trick or treating!
Ana

Creamy Pumpkin and Goat Cheese Pasta Sauce

2 small shallots, chopped
4 small garlic cloves, chopped
1 tablespoon olive oil
1 cup pumpkin puree
2 cups vegetable broth
1/4 teaspoon cinnamon
ground nutmeg (I never measure this, just grind a bit on top of the sauce)
1/8 tsp ground (rubbed) sage
1 to 2 oz goat cheese (again, I didn't measure, just took a blob and added to the sauce, I believe I used about 1 oz).
Salt and freshly ground black pepper to taste

Saute garlic and shallots in a pan until soft. Add pumpkin puree, broth, cinnamon (it might sound weird the cinnamon in here, but I promise, it taste good!), nutmeg, salt and pepper to taste. Bring sauce to a boil, add goat cheese and mix to incorporate. Add your favorite shape of cooked pasta to sauce and toss, serve with grated Parmesan cheese.
(We used bucattini, but I think penne pasta would be awesome with this sauce!)

Tuesday, October 26, 2010


Pumpkin Oat Bran

How can you not start your day in a good mood with such a bowl like the one above for breakfast?
I am a firm believer that eating breakfast is essential to start your metabolism in the morning (after hours of fasting overnight) and get you going through your day.
With that in mind I always try to make our breakfast nutritious and delicious, and with a kid in the house sometimes the fun factor enters in the mix and we are sure to have a great start in the morning.
For the bowl pictured above I cooked 1/2 cup of oat bran with 1/2 cup water, 1 cup almond milk, 1/2 cup pureed pumpkin, about 1/2 to 1 tsp cinnamon, a dash of ground clove (or sub 1/2 to 1 tsp pumpkin pie spice) and sweetener to taste (I make mine unsweetened, but Matheus likes his with either honey or maple syrup). Put everything into the pan and cook on medium until oat bran is cooked and you achieved the desired thickness.
I like it more loose than most people, not a fan of thick and gummy oats or oat bran. I like it a bit on the wet side, and since it thicken as it sits, I always take it of the stove before it gets to the consistency I like.
Ultra easy to make, plus oat bran cooks so fast that in less than 10 minutes you have a nice and warm bowl of steamy goodness! Top with a tablespoon of almond butter and you have a totally nutritious breakfast to start your day. (Coconut butter is also amazing with oats and oat bran! I am slightly obsessed with this combo lately...)
And if you are like us, you will strategically place that almond butter right in the center of your bowl, then add a couple of raisin eyes, a chocolate chip mouth and your masterpiece is complete: Mrs. Pumpkin Oat Bran is in the house! (And boy those chocolate chips were delicious in there, melted chocolate goodness!)
The same ingredients are just as good with oatmeal in place of the oat bran. It may take a couple more minutes to cook, but so worth it.
I love oats in all forms!
Ana

Tuesday, October 19, 2010

My best Apple Cake yet!

Fall is definitely here and that to me translates to not only colder weather (which I do not like) but mostly to lots of pumpkin (which I love), butternut squashes, acorn squashes, all winter squashes, cinnamon, and of course apples. Even though we have apples available year round it is during fall - their peak season - that they are the sweetest and have the most delicious flavors.
For the past couple weeks we have been inundated with apples in our CSA box, so we have been eating them out of hand, taking to school as a snack, and also making delicious homemade applesauce - a favorite of mine and Matheus' too.
With an urge to bake and lots of apples staring at me from the fruit bowl on the counter top I entered the kitchen ready and full of the best intentions to create something delicious, nutritious and also easy to make.
I am happy to inform that my mission was accomplished and it turned out into a Vegan Apple Cake that is definitely the best apple cake I have ever made.
The first cake I baked was left on the counter while I went out for a few hours, and upon my return half of it was gone, the husband really liked it. We polished the rest of it the next morning for breakfast, so I didn't even had a chance to take a picture.
Since we loved it so much, and yes, I still had apples on the counter, I made another one. This time I rushed and did take a picture though! phew! (and as you can see in the pic, there were even more apples around!)
There is nothing fancy about this cake but the flavors are spot on, I also think it looks great, and better than anything: it makes your house smell wonderful as it bakes!
And as I said before, it is super easy to make. It is the "mix-dry-with-wet" type cake, no mixer, no special equipments needed, plus you can have it in the oven in no time.
When it comes to cake, the simple ones are my favorites (I am not an icing, filling, "stuff in the middle of my cake" gal), and this apple cake even though as simple as it turned out is also flavorful, fruity, and fragrant. Perfect to have with tea, or maybe a cup of warm milk.
One note: I used my homemade applesauce but you can certainly use any apple sauce or pureed apple you have - I actually used the store bought plain applesauce on the second cake I baked as we were out of the homemade deliciousness (it never lasts long!)
If you like apple cakes definitely try this one, and then let me know what you think. Around here it was a massive success. The last piece of the second cake I baked was hidden by Matheus one night so he could have it for breakfast on the next day (he was afraid dad would eat it!). And right then, after breakfast I got another request to make some more, from both boys.
You can't make a mom who loves to cook happier than when you say you love her food and ask for more!
Ana

See what I mean by "mix-dry-with-wet" kind of cake?! All you need for this are two bowls. I used a pan with removable sides for this and lined the bottom with parchment paper, but any 8 or 9 inch round cake pan should work, just make sure you oil it a bit.


Vegan Apple Cake

Preheat oven to 350F. Lightly oil a round cake pan (either 8 or 9 inches)

In a small bowl mix together:
6 tbsp. water
2 tbsp. ground flax seeds
1/2 cup brown sugar
1/2 cup applesauce
1/2 cup canola oil (or another neutral oil you might like)
1/4 cup almond milk (or soy milk, or milk of your choice - if using cow's milk this won't be vegan anymore)
1 tsp. vanilla

In a big bowl mix together:
1 cup all purpose flour
1 cup whole wheat flour
1 tbsp cinnamon (looks like a lot, but trust me, it makes the cake taste and smell incredible!)
2 tsp baking powder
3 small apples, cored and chopped (peeled if you prefer)

Add the wet ingredients to the dry ingredients, mix until combined. Pour batter into pan (it will be thick) and flatten with a spatula or back of a spoon. Bake for about 30 minutes, or until your house is smelling amazing and a toothpick inserted in the center comes out clean!

Saturday, October 16, 2010

Awesome Brown!!

Being a foodie as I am, and one that likes science at that, it is no surprise that one of the food personalities I love the most is Alton Brown. His show, Good Eats, is one of my very favorite ones and I have been watching it since the beginning, around 2000.
In the show Alton is the most fun and creative person around food I have ever seen, he explains not only how to prepare a particular food but also the science behind it, the how's and why's something acts the way it does during cooking, which is why I like his show so much, learning is something I love to do and when it relates to food... sign me up for it!
I absolutely love his Good Eats show and as I learned that Alton Brown was coming to Raleigh (almost 2 months ago) I immediately reserved the date on my calendar and assigned the husband as the primary caregiver during the hours I would spend at the local independent bookstore that my idol was doing his appearance.
I knew that a few hours of waiting would take place, so I sat there, walked to Whole Foods right next door and got me some soup, came back, sat a little more and read his most recent book cover to cover, and patiently waited for my turn to get up there and get not only an autograph but also a picture! Awesome! I loved that he took pictures with everyone.
A bit before the signing began he also did some talking and answered questions from the audience.
Now, he seems fun and nice on the show, right? And he is that and much more in person! I was impressed by how nice he was, so funny, I laughed the whole 40 minutes he talked! Entertaining, smart, funny, and knows how to cook, what else would you want on a man?! Oh yes, and since it was a school night he made sure that those with kids would be the first ones to get their book signed, how cool is that? (And I left Matheus home... bummer!) True gentleman!
It was really fun to meet Alton Brown, he is all I thought he would be and more, definitely my favorite food star. Awesome, awesome Brown!
Ana

Friday, October 08, 2010

Flourless Crepes a la HEAB!

After having these for lunch two days in a row I just needed to take a good picture and post here this ridiculously easy recipe that I have been enjoying: Flourless Crepes (or egg crepes as I have been calling at home). The recipe is super easy and I learned it from Heather, from HEAB, one of my favorite blogs!

It is so simple, but turns our so good and delicious that I could not even believe my tastebuds!
After having a bright and sunny morning all for myself with no classes (fall break! yay!) and yoga with my favorite instructor, I came home with a hungry belly and ready for something delicious and quick. Couldn't be more perfect than these!

All you need are 2 eggs and a 1/4 tsp of baking powder, that's it. Whip both together and pour into your preheated (I add a bit of olive oil so it doesn't stick) pan just enough "batter" to fully coat the bottom. Cover with a lid and let it cook for one to two minutes. That's all people, there isn't even a need to flip! Remove from the pan and load your fillings.

Which brings me to the point: the filling. That's what I loved the most about these. I filled mine with chopped tomatoes, chopped avocados (both which I seasoned with salt and pepper) and goat cheese. Oh my world, the creamy filling was amazing! If you never had eggs + avocados then you need to try, it is a great combo. Add some goat cheese and it is incredibly good, soooo creamy, I love it!

I made my crepes in a 8-inch skillet, just because it is my newest one nothing is sticking to it. But you can make them bigger in a 10 or even a 12 inch. Since mine was smallish I made 4 crepes. I know, you only see three of them there, and that is because I could not resist the first one, I simply sprinkled goat cheese on it, rolled it up and went to town... goat cheese and eggs is a pair made in heaven.

I had my crepes on top of a spinach and arugula salad topped with grilled zucchini rounds, pair this with a piece of warm and toasted whole grain bread with a bit of butter and you have a delicious meal without much effort at all.

By the way, I love arugula salad, and wanted to share the way I dress my salad, I don't have real measurements, but here is the method: put arugula into a bowl, season with salt, pepper, a drizzle of olive oil, some sprinkles of white balsamic (or rice) vinegar, and a drizzle of honey! Yep, honey, that's what makes this salad taste so delicious. The sweetness of the honey pairs beautifully with the peppery flavors of the arugula, I love this salad and had it throughout the summer, never get tired of it!

Hope you guys like the Flourless Crepe idea it as much as I and Heather did!
Ana

Thursday, October 07, 2010

Easy veg weeknight meal!

Sometimes all we need for a good meal is something easy to prepare and that taste good right? With all the studying and attending classes for my masters degree plus life as a stay home mom, take to school, pick up, soccer practices, playdates, and more, there are days when I don't have that much time to get dinner on the table, so the less complicated the dish the more appealing it is to me.
This is a recipe that fits perfectly for such days, easy and quick to put together, tastes delicious and makes everyone happy! Serve with a side salad, maybe some rolls or something of the like, and you are good to go! (just make sure to have your phyllo dough defrosted)
Could not be better!
I got the recipe idea from one of my favorite magazines, Vegetarian Times. I like their recipes a lot, usually pretty flavorful and uncomplicated, and vegetarian to boot, score!
Another plus of this recipe? You can adapt to whatever veggies you may have in your fridge, just make sure it is not something too moist/watery, and you are good to go! :-)
Ana

Spinach, Feta, and Tomato Quiche
(Adapted from Vegetarian Times)

8 sheets of phyllo dough
Olive oil to brush the dough
10 oz frozen spinach, thawed and water squeezed out (make sure to really squeeze this baby, they have a lot more water than you imagine) - by the way, I seasoned my spinach with salt, pepper, and garlic powder before adding it to the quiche.
1/3 cup feta cheese - I used ricotta salata since I had that at home
Cherry tomatoes to fill the top - I used a combo cherry tomatoes from the backyard and chopped roma from the CSA box as that was what I had on hand
2 eggs
3/4 cup milk
dash of Salt and a few turns of freshly ground black pepper

Preheat oven 350F.
Brush a pie plate/pan with olive oil and layer one sheet of the phyllo dough in it, brush dough with olive oil and repeat the layering and brushing with all other phyllo dough sheets. When done tuck in the parts of dough that are hanging around the plate (or trim if you prefer, I love the crispy borders and don't like wasting it, so I tuck it in!).
Sprinkle the crust with the cheese, top with the spinach and layer the tomatoes on top of that.
In a bowl beat the eggs with the milk, season with salt and pepper, and pour over the veggies in the prepared crust.
Bake for about 40 to 45 minutes or until the top is golden brown and the egg is set.

Tuesday, September 28, 2010

Hemp Protein
As soon as I posted about Jay Robb's Unflavored whey protein powder I had an itch to come back and post about another one I discovered last year that also became a favorite: Amazing Meal Pomegranate Mango Infusion! (these by the way were the only two powders that stuck with me after my period of daily protein need - which you can read why here - and the only ones I ever bought a full canister of, the other ones I am still to share I only tried sample packets)


Omg, this is by far my favorite protein of all I have tried! Yes, I like it more than the unflavored whey protein, much, much more.
Not only because this stuff is super flavorful, but also because, besides being made with a vegetarian type protein, it is packed full of good for you nutrients. It is a greens + fruits + veggies + protein combo that offers vegetarian protein coming from Hemp and Rice plus goodies such as wheat grass, acai, blueberries, goji berries, flax, probiotics, and a delicious pomegranate mango flavor. Well, to be true I don't taste mango or pomegranate in there, but whatever it is called, it is amazingly good. No wonder it has that name!
Seriously, I don't buy stuff in canisters that often, and I did start with a sample packet of this one, but boy oh boy, I did go through a few canisters of this so far since I first tried it. One drawback is that this powder isn't cheap, as with protein powders in general, but this one is an occasional treat to me.
Many delicious smoothies were made with the Amazing Meal powder, and my favorite actually involved fruits, and guess what, the fruits I liked the most with this were strawberries and... mangoes! Yep, mangoes are gorgeous with this protein powder.


One thing I love about this powder is that it is thick, like super thick, especially when you mix with fruits. So during the colder months I could make thick smoothies the way I like and not need to add ice, sweet! As you can see on the shake above, the straw is positioned right in the middle of the smoothie and it is sticking up, not touching the glass itself, pretty thick deliciousness, no ice required.
There are also other flavors of Amazing Meal I tried:

Original


Chocolate


The original was blah, the chocolate was good, but a bit uhm, grassy (?!), but I still like it. However, as much as they were good, to me the Pomegranate Mango Infusion is the very best, I really love it!!
Now, the same company that makes the amazing Amazing Meal powders is called Amazing Grass, and they have an entire line of healthy and vegetarian products that caught my attention after I sampled some of their goods. I did try a few more products and I gotta say, I liked them too!
The favorite from the other stuff I tried was the GreenSuperFood powder, which is an all natural drink powder mix of wheat grass and other greens like alfafa, spirulina, spinach, chorella, brocolli, acai, maca, carrot, green tea, acerola, flax, probiotics and more.


It may not be the most delicious thing at first, but it is one of those things where the flavor sort of "grows on you", and what got me hooked into this was that I found it to be really energizing. For some reason it gave me energy and clarity in the morning when I added it to my smoothies before I went to classes or to the gym. I was impressed at first as I didn't want to attribute this new feeling of energy to a powder from a tub, but I finally realized that yes, the greensuperfood was kinda good for me, and in more than one sense too (how can it not be with all those goodies in it?!)
So I did end up getting myself one tub of the stuff after trying the packet sample I initially got, and I never went back, a few more tubs sure followed that first one.
Now, I am not saying I drink these powders everyday, but sometimes I feel like I can go for it and it always help some.

I tried the GreenSuperFood in chocolate flavor too:


And it is good, I like this one a lot!!
And then I tried their GreenSuperFood Bars, which I totally liked too! I liked the original one a lot, the berry one was good too, but I didn't like the peanut flavor (it was too dry). And since I am a chocolate girl... the chocolate bar was definitely my favorite. It is basically the original flavor bar with a thin chocolate coating.


So here it is, my review of the Amazing Grass products I tried.
And, again I want to make it clear that I am not receiving anything to do these reviews, I am only posting about the products I tried and liked, to share my findings and as a way to keep a personal archive of foods I enjoyed.

So, is there any products you have tried lately and enjoyed?
Ana
Protein Powders, a few review posts

Last year, due to a personal issue and some exams to be performed later on, I was asked by my physician to supplement my diet with a daily protein shake for a few months. Since I am a person who eats mostly natural foods, fruits and veggies and lots of grains and beans, I wasn't familiar with protein powders in any form or nature.
However, when it comes to food I am one who loves to experiment and discover new flavors. So, knowing it would be to my benefit to incorporate said shake into my daily eats, I embarked on the medical request and went to figure out the protein world.
Little did I know that there were lots of different types of protein powders out there, many flavors, varieties and all sort of animal and plant sources they were derived from. I then decided I would little by little try some of the options and try to find one that I liked.
I found some that I liked, some I did not, and a few that I loved and ended up becoming part of my post-workout snacks and sometimes breakfast smoothies.
Some of the varieties I tried included whey protein, hemp protein, egg white protein, pea protein, brown rice protein, and even a few that had a mix of vegetarian proteins.
I was happy to find individual bags of some of them to buy so I could try before committing to buy a full tub (because protein powder ain't no cheap thing, ya' know!). Some of them didn't have said trial packets, so for a couple that I wanted to try I contacted the company asking if they offered packets or maybe sold them on their websites so I could try, and I was happy with a couple of responses I got with offers to send me in a packet or two. More than that, the two companies who sent me samples were two of the best protein powders I ended up trying!
So, during the next few posts I will be doing some reviews of some of the products I tried.
I want to make sure though that I make it clear that I am not receiving anything to do these reviews, I am only posting about the products I tried and liked, just to share my findings and as a way to keep a personal archive of foods I enjoyed.

With that said I will begin my review with the one I liked best of all: Jay Robb Unflavored Whey Protein Powder!


This one my friends is my favorite whey protein. Well, to be quite true I didn't try many, only this and the whole foods brand, which was not that good. The reason why I liked this and stuck with it was simply because it is unsweetened, unflavored, un-everything. It is just pure whey protein isolate and works wonders on any type or flavor of shake you can ever imagine. I tried this with the most varied array of fruits: berries, bananas, papaya, mangoes, you name it. Plus it is great to make chocolate shake! Add a tbsp of cocoa, a few drops of stevia (or honey, or the sweetener of your choice), a few cubes of ice and you have a thick and delicious chocolate smoothie!
I found that the trick with this one though is not adding too much water, when it is too thin it is not all that good - or at least I like my shakes on the thick side! (And who likes watery shakes anyway?)
It also makes great Protein Ice Cream, HEAB style! (Btw, this ice cream is addicting, I had many chocolate protein ice cream this summer! Soooooo good!).
Now, I tried two of Jay Robb's flavored powders - vanilla and chocolate - and I did not like them, too much stevia, way too sweet. Another one of his line I tried was the egg white protein... blech! Horrible. I love eggs, I love egg whites, egg white omeletes, fritattas, you name it, but the smell of the powder and the slimy-eggy flavor and texture of the finished shake... not for me. Sorry Jay.
Anyway, the unflavored whey was the first protein powder I ever tried, and it is the one I use when I want to have whey protein.
So, here is the first one of my protein powder posts. Bear with me, I don't want to change things around the blog, but I want to be able to share some of my new products discoveries here too besides recipes. And I promise I won't stop posting those!! (I even have a delicious and easy quiche I am coming back to share!)
See you soon!
Ana

As an aside, please don't think that I live on protein powders. It was a phase of my life that I had to go through, one that wasn't all pleasant and which took me a year to overcome, so now that I am ok with it all I decided to share some of my findings and pictures I took of the products while I went through it. (what can I say, food blogers love to take picture of foods, right?!)
I definitely like to consume my food in real food form, no powders will ever substitute a good meal for me, and it shouldn't, for anyone.
As a nutritionist to be I have my ideals of good nutritious foods and I would never chose to go on a protein powder bonanza unless I really had to, so try not to judge.
Ana

Sunday, September 19, 2010


Eleven years together should be celebrated, right?!
Happy Anniversary to us!

The date was yesterday (Sept. 18), and we went out to a lovely dinner. Look what our sweet server did for us when I told her it was our anniversary:


My dessert was beyond delicious and I was so happy with the cute plate with happy anniversary piped in chocolate! One of the most delicious and flavorful ice creams I have had. In this little bowl of deliciousness there were 5 flavors: Chocolate Chili, Vanilla, Peach, Thai Basil and Olive Oil.
For an ice cream lover like me this was awesomeness on a plate, couldn't think a better way to finish the amazing meal we had - which also included a very good squash and apple soup and a deliciously and velvety creamy butternut squash risotto (heaven on a plate!), and the husband had fish. Everything was so pretty and so good that we forgot to take pictures of the main dishes.
All in all a great night out, celebrating, having fun, talking, and loving, much loving from being together this past 11 years and wishes for many 11 more!
Love you Fran!
Ana

Wednesday, September 08, 2010


Zucchini, Goat Cheese and Herbs Savory Bread

Another one of Elvira’s delicious savory bread! This one I have made more than once, usually in the summer when the zucchini and herbs are plentiful. It is a nice dish for a quick weeknight meal, and you can even prepare ahead of time which makes it even better. Totally helpful to come home from soccer practice and have something delicious waiting for you, no?!!

Just as with the sun-dried tomatoes bread the combination of flavors here is delicious, plus tell me: what doesn’t taste good with goat cheese??? Goat cheese is one of my favorite cheeses and here it really shines with the herbs, totally delicious!

Easy and simple to make, so much so that I am even going to keep this post short so you can go ahead and make it yourself, I am sure it is going to be fast and so rewarding that just like us you will be making this over and over, for many summers to come!

Enjoy!

Ana


And, for my Brazilian friends, you can see the recipe in Portuguese over at Elvira's blog by clicking here!


Since we are back in school I also made some in fun shapes and froze to use in future lunchboxes! yum!


Zucchini, Goat Cheese and Herbs Savory Bread

(adapted from Elvira’s Bistro)


100 grams all purpose flour

100 grams whole wheat flour

1 teaspoon baking powder

3 eggs

50 grams grated parmesan cheese

50 ml extra virgin olive oil

150 ml milk

100 grams goat cheese, chopped or crumbled into chunks

3 tablespoons chopped herbs (I used basil, parsley and oregano)

1 zucchini, grated

Salt and pepper to taste


Preheat oven to 350F. Grease and flour a loaf pan.

In a large bowl mix the flours, baking powder, a bit of salt (1/3 teaspoon) and pepper. Add the eggs, olive oil and the milk and mix together until you have a smooth batter. Add the grated zucchini, grated parmesan cheese, herbs and goat cheese and mix gently with a wooden spoon until all is incorporated.

Pour batter into prepared pan and bake at 350F for about 40 to 45 minutes until golden, or until a toothpick (or the tip of a knife) inserted in the center comes out clean. Let it cool for about 10 minutes in the pan before unmolding. Let it cool before serving.

Tuesday, September 07, 2010


Kale Salad


Kale is a veggie I haven’t posted much about. And I don’t even know why not because we really like these dark green leaves! Kale is one of the most nutritious green leafy vegetables around, it is packed with vitamins, calcium, iron, lots of good for us nutrients, plus it tastes really good too!

Believe it or not Matheus loves kale, in all shapes and forms. We go grocery shopping together and you might bet that there will be a bunch of kale in our cart. We like it sautéed with onions, garlic, salt pepper and olive oil, sooo good! And we love it as “kale chips” (which I will come back to post about), and now we have been venturing ourselves in the world of kale salads!

I tried a kale salad once in a cooking class I attended and I just loved the texture and taste, so when I saw this recipe I knew I had to try. And I did. And I have made it multiple times already since the first time we tried it. Which by the way I didn’t even get a chance to be photographed, yes, this salad it that good!

Yesterday though I made sure to get a picture as I like not only how it taste but also how it looks. The flavors in this salad are just as bright as the colors you see!

It is a very simple and easy to make recipe, and it has a bonus of being one of those salads you can (and maybe even should) make in advance. It really holds up, with dressing and all, and tastes amazing the next day.

I loved the combination of the lemony dressing with the earthiness of the kale and the sweetness of the mango chunks, plus the pepitas add just the right amount of crunchiness to make this salad even more attractive to the taste buds.

Something new and different to try!

Ana


Ps: I love those pepitas just by themselves, they are so good!!

Ps2: I made my salad mostly by tasting and adjusting the seasonings, I didn’t make the vinaigrette separate to put on top as the recipe stated as I thought it was flavorful and dressed enough after massaging it. Here I am posting the way I made mine, so if you want more specific measurements then click HERE and take a look at the original recipe.


Kale Salad

(adapted from an Aarti's Sequeira recipe)


1 bunch kale (remove and discard stalks), thinly slice the leaves

Juice of ½ lemon (more if you want)

Extra virgin olive oil

Salt to taste

About 2 teaspoons honey

Freshly ground black pepper

¾ cup diced mangoes

2 tablespoons toasted pepitas (pumpkin seeds)


Put sliced kale in a large bowl, add the lemon juice, a bit of salt, pepper and a drizzle of olive oil and, using your hands, massage the seasonings into the kale leaves until the kale is softened and wilted, about 2 minutes. Taste to check the seasonings and add more lemon juice, another drizzle of olive oil and more salt and pepper, if necessary. Add mangoes and toss together with salad. Sprinkle the pepitas on top before serving.