Friday, March 30, 2007


Fish Cakes

After a few days with some sort of stomach virus acompanied of lots of nausea and absolutely no desire to eat, I started to feel better and yesterday went to get some fish in order to make a yummy looking recipe from Fernanda's blog Chucrute com Salsicha. The recipe called for halibut, but unfortunately they did not have any fresh ones at the market and I ended up coming back home with a few tilapia fillets instead.
I did get some fish, but it sure was not the one I wanted, so I decided to make something else and save Fernanda's recipe to make with halibut as soon as I can get my hands on some fresh and good looking fillets. (After getting the fish it seemed I wasn't actually in the mood for it, has it happened to you before?)
Since fish is very perishable I needed to find some good recipe to make with my fillets before the went bad. So, I went for a search and easilly found a recipe that will most definitely be repeated at our house.
Matheus has been asking me to make crab cakes (he has never had it, and neither have I), so I decided to look for something similar in order to satisfy his cravings in some way, even though there were no signs of crab meat near my house.
I found a recipe for Fish Cakes and decided to make it for our dinner today. What a happy choice it was!
The recipe is super easy to make and the end result were very nice and fluffy cakes with a subtle fish taste and delicious creaminess from the potatoes used in the dough.
Matheus loved the cakes, as did the husband, yep, it was a success!
I did cook my tilapia fillets in order to make these, but I believe this is a wonderfull recipe to use when you have leftovers fish around. I can see this being made with most kinds of white fishes, and even with salmon - which would probably give these a nice pinkish hue.
I may even try making these using crab meat instead of the fish, as I was very fond of the potatoes and the texture it provided, plus it doesn't have any mayonaise in it, which I absolutely cannot stand.
All in all a great recipe, nice and simple with great flavor to boot!
We had ours with some steamed carrots and ranch dressing or as Matheus calls it: "dipping sauce", oh, and Matheus had the idea of having some ketchup with it too. I know it may sound odd, but it did tasted good! :o) (not really gourmet as some tartar sauce would be, but not bad either!)
I made half of the recipe and got 6 nice sized cakes; I used Tilapia and red skinned potatoes on mine (cooking both in salted water to impart more flavor - to the fish water I also added the juice of half lemon), everything else was done per the recipe. By the way, this great idea came from the wonderfull blog Simply Recipes. Thanks Elise for another delicious recipe!!
Enjoy!
Ana

Fish Cakes
(Adapted from Elise's recipe at "Simply Recipes" food blog)

1 lb of white fish fillets
2 medium-sized baking potatoes (or 4 red or yellow potatoes)
1 cup bread crumbs
1/4 cup chopped fresh parsley
2 Tbsp freshly grated Parmesan cheese
2 garlic cloves, finely chopped
1 teaspoon salt
1/2 teaspoon pepper
2 eggs, lightly beaten
Grapeseed oil, or other high smoke point oil such as canola oil, for frying

Boil and mash the potatoes, set them aside.
Boil the fish until it flakes easkly. Drain and flake the fish with a fork.
Mix the flaked fish, the potatoes and the rest of the ingredients together well by hand. If the mixture is too crumbly, add another egg. If too sticky, add more bread crumbs.
Form the mixture into cakes and fry them on medium high heat in a skillet coated with oil.
Makes 12 fish cakes. Serves 4-6.

Monday, March 26, 2007

It was a Soccer Party!!

I still can't believe my "baby" already turned 5, but the party sure was fun! Matheus' birthday was yesterday and we had a party for him at the place he practices soccer. It was great, the kids had a blast running around and kicking balls. One of the coaches was there and kept them busy and laughing for the entire time.
Matheus loved it, he was so happy, and of course so was I! The cake was his idea, a soccer field, and let me tell you, the kids loooooved it!
It was my first attempt with fondant, and I believe a very successful one. I got some tips with a friend that is used to making cakes like this and didn't have much problems. The fondant was actually easy to work with and I had so much fun making the cake, coloring and rolling the fondant. It took me a while to get everything done, but it was so worth it!
I loved and even told my husband that one day I will work with this type of thing. I had the best time doing it, and can you imagine getting paid and having this much fun??? I can just dream about it!
The cake itself was a recipe for chocolate cake that I first made when I was in Brazil, and I have actually mentioned this recipe here. It has the basics ingredients in it, simple method of preparation, but the result is outstanding. I loved this cake from the moment I tasted the batter the first time I made. Simple but yet delectable, rich chocolate taste with just the right amount of sweetness to it. Everyone enjoyed it and I even got some requests for the recipe from some of the mom's, how cool it that??!
So, here is the recipe for all of you who would like a taste of my little soccer cake! I am also including the ganache that came with the recipe originally, you can use it to fill and cover the cake if desired. This cake covered and filled with the ganache was one of the best chocolate cakes I have ever had, yumm!!
Enjoy!!
Ana

The one piece leftover from the cake (the kids really liked the cake, everyone wanted to touch it and even the little guys on the top were taken home as souvenirs!!)


Cocoa Cake with Chocolate Ganache
(Adapted from the book "Cozinha de Estar" by Rita Lobo)

2 cups all-purpose flour
1 cup cocoa
2 tablespoons baking powder
1/2 teaspoon salt
200 grams butter, room temperature
2 cups sugar
4 eggs
1 cup milk

Ganache:
400 grams semisweet chocolate
2 cups heavy whipping cream

For the cake
Preheat oven 350F. Grease and flour a round cake pan (it can also be baked in bundt or rectangular 13x9 pans).
Sift the flour, cocoa, salt, and baking powder, set aside.
With the mixer beat butter and sugar until light and fluffy. Add eggs, one at a time, and keep beating to incorporate.
On low speed, add flour mixture alternating with the milk. Do this in three additions, starting and ending with the flour. Mix everything just until well incorporated.
Pour batter into prepared pan and bake at 350F for about 40 to 45 minutes, or until a toothpick inserted in center comes out clean. Let cake cool completely before filling and covering with the ganache.

For the ganache:
Put cream on a sauce pan and heat until it reaches a boil. Remove from heat, add chocolate and let it rest for about 10 minutes. Gently mix the chocolate and cream mixture until all the chocolate is melted and the ganache is uniform. Pour mixture in a bowl, cover with plastic wrap and let it cool in the frige for about 30 minutes, or until it has a good consistency to be applied to the cake.


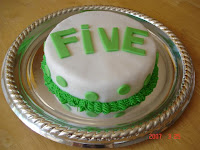
Since I had fondant leftover I decided to make a second small cake. It turned out kind of cute, didn't it??!

Wednesday, March 21, 2007

Arancini Balls

I made these last week and they were sooo good that I already want to make them again! I actually almost cooked a lot more brown rice than usual at the beginning of the week just to have some leftovers for this! :o)
These Mozzarella-Stuffed Arancini were delicious, creamy and gooey from the mozzarella on the inside and crusty on the outside, yes, the outside got incredibly crispy. I was amazed with the results, as were the husband and Matheus, they both loved it too and there was no leftovers after dinner on that day! Yum!
Arancini is a Italian savory concoction; rice balls stuffed with cheese and usually made with leftover risotto. I made this one with brown rice, but if made with aborio rice (or risotto rice) it would certainly be even better, and probably even creamier. I don't know if this recipe is true to its origins, but is definitely one worth trying. Also, Arancini are normally fried, but these were just how I like, going directly to the oven, they came out great and I loved them being made this way too. You may save some calories, and in my case, some stomachache too.
As usual, I adapted the recipe accordingly to what I had on hand, but nothing too major that would alter the end results so much. First, I used leftover cooked brown rice that I had on the fridge instead of cooking some instant rice as the recipe calls for, second I used grated Parmesan instead of Romano and omitted the green onions (didn't have), and finally, I used some regular mozzarella, as I didn't have any marinated ones around. I sort of eyeballed the amount of rice and halved the recipe. And even though I changed the recipe a bit they still came out great!
Easy and delicious, simple to make and to put together when you have rice and marinara sauce hanging around. We enjoyed this a lot, hope you like it too!
Ana


Mozzarella-Stuffed Arancini
(Adapted from Vegetarian Times, February 2007)

1 1/2 cups instant brown rice
4 green onions, divided
2 cloves garlic, minced
2 eggs, lightly beaten
1/2 cup chopped parsley
1/3 cup grated Romano cheese
2 cups breadcrumbs
16 marinated fresh mozzarella balls
Olive oil for drizzling
Marinara sauce for serving

Combine rice, 1 green onion, garlic and 3 1/2 cups water in a saucepan. Boil, reduce heat, cover and simmer 15 to 20 minutes, or until rice is soft and slightly sticky. Remove from heat, remove green onions and let cool.
Preheat oven to 425F. Line a baking sheet with foil or use cooking spray. Chop remaining green onions.
Fold eggs, parsley, cheese and onions into rice. Spread the breadcrumbs on a plate.
Place about 1/4 cup of the rice mixture in the palm of your hand, shape it into a ball around one mozzarella ball. Roll your arancini in the breadcrumbs and place them on the prepared baking sheet.
Drizzle the balls with olive oil (alternatively, you can use the oil from the mozzarella marinade for this) and bake for 20 to 25 minutes, or until browned on the outside.
Warm marinara sauce and serve with the arancini balls, garnish with parsley if desired.

Saturday, March 17, 2007

Happy St. Patrick's Day!

With kids around celebrations always call for cookies, right?!
I made these cookies using the simple and delicious sugar cookie recipe that you can find clicking here. This is the easiest sugar cookie recipe I have made, you don't even need to chill it!
I colored it green by adding gel food coloring while beating the butter and sugar, it was the first time I tried coloring cookie dough and found my idea to be very effective as I didn't end up with a huge mess as previously happened to me. (food coloring can be messy and I certainly didn't want a green hued kitchen!)
Fun to make and to eat too! It yielded a lot of cookies, to bring to the teachers and to share with coworkers, plus we got some nice green smiles as a reward!
By the way, can you tell I used 4 little hearts in order to make each cookie? Yep, it took a while but I got it done, and now I promised myself I will finally go ahead and buy one of those "multi-cookie-cutters-kit", and hope there is a shamrock one in between those for the years to come! :o)
Ana

Ps: I promisse I will be back posting, I made a yummy recipe this past week!

It felt like valentine's day again...!!